Jean-Remi
Thursday, March 27, 2025
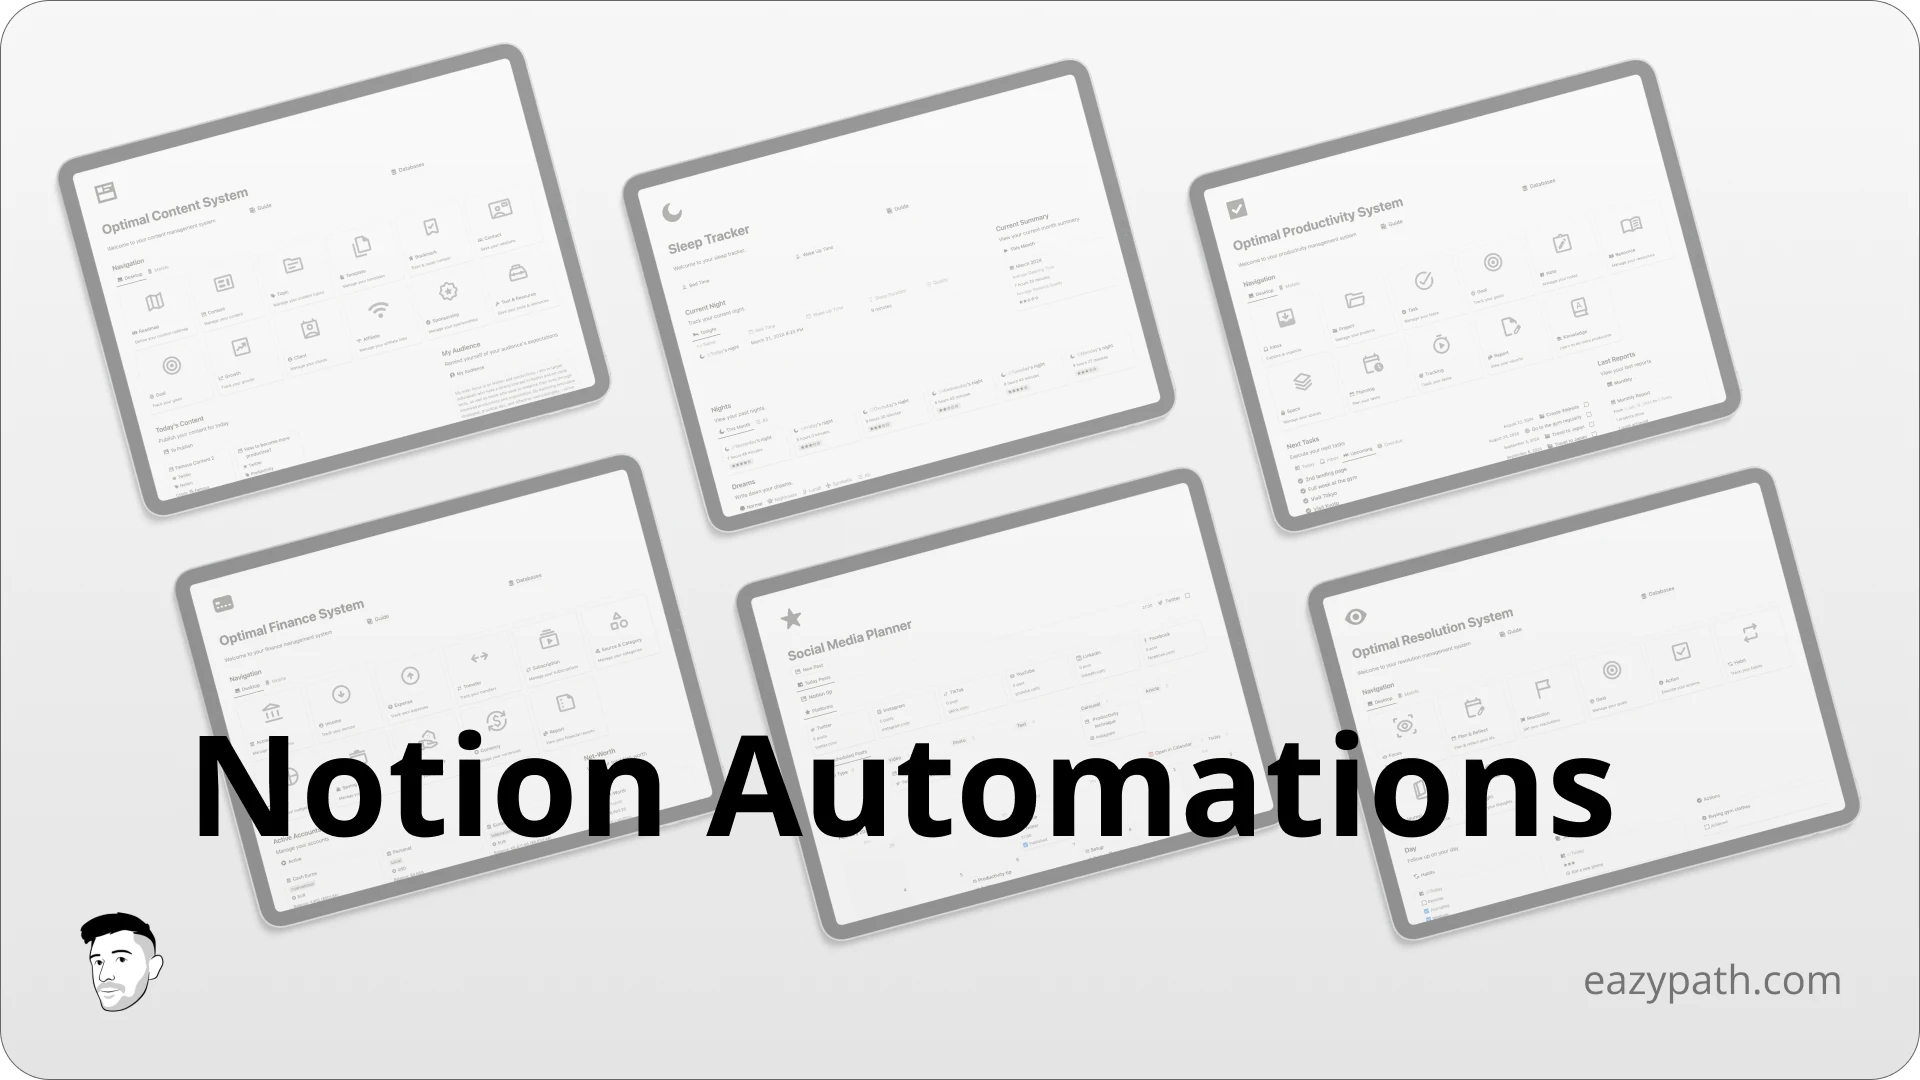
Notion Database Automation is one of Notion's most underrated features. It enables you to create fully automated workflows directly within Notion. You can automatically add new pages, edit properties in your database, and even send Slack or email notifications.
Since its release nearly a year ago, the feature has continually improved with new triggers and actions added.
In this comprehensive guide, we will explore how to create a Notion database automation, from defining the scope to executing actions. We'll also cover specific use cases and explore who can benefit from these automations.
Let's start!
How to Create a Notion Database Automation?
You can start creating a Notion database automations by simply pressing the lightning symbol on any view of a database.
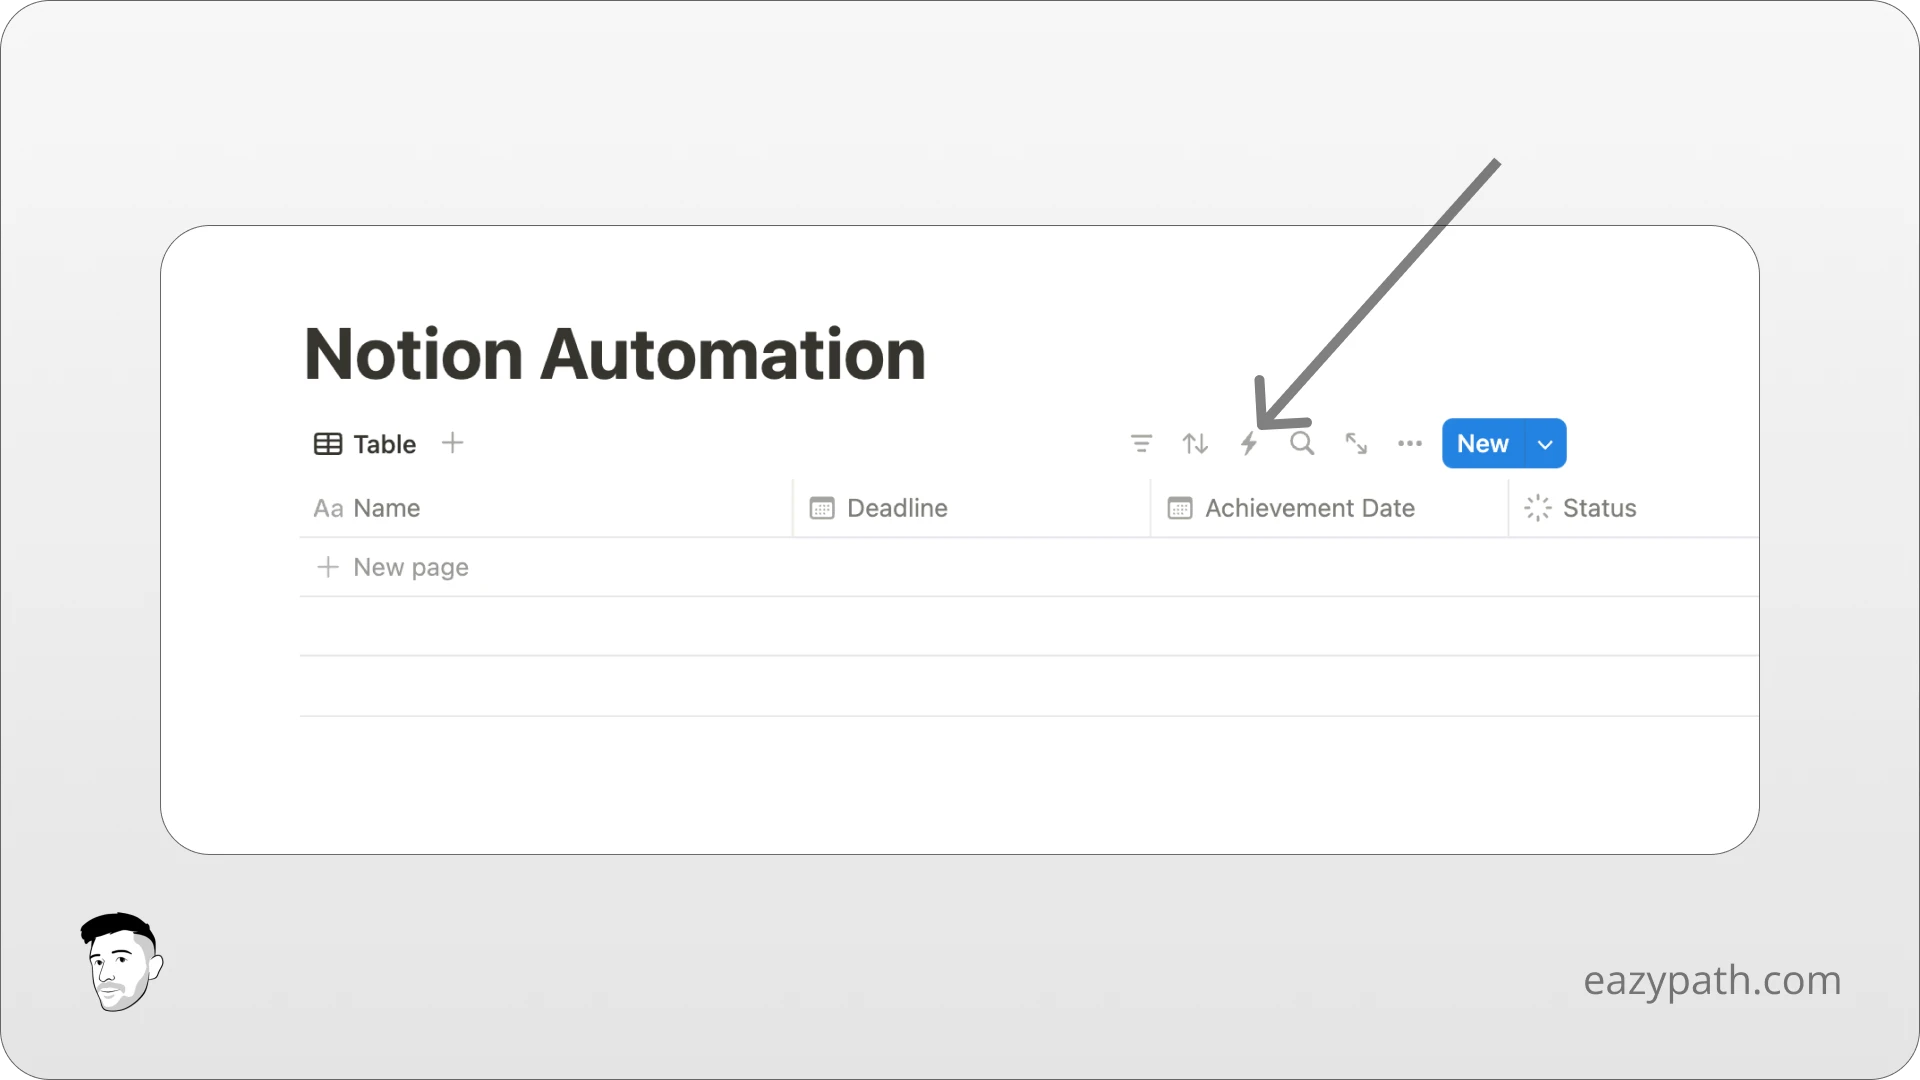
Once you click it, you will see a popup appear. Now let's understand how Notion automations work. You have 3 specific components:
Scope: It defines whether the automation will be triggered on the entire database or on a specific view.
Trigger or When: It defines the event that will start the automation, such as a new page added or a property edited.
Action or Do: It defines what the automation will execute, like changing a property or adding a new page in another database.
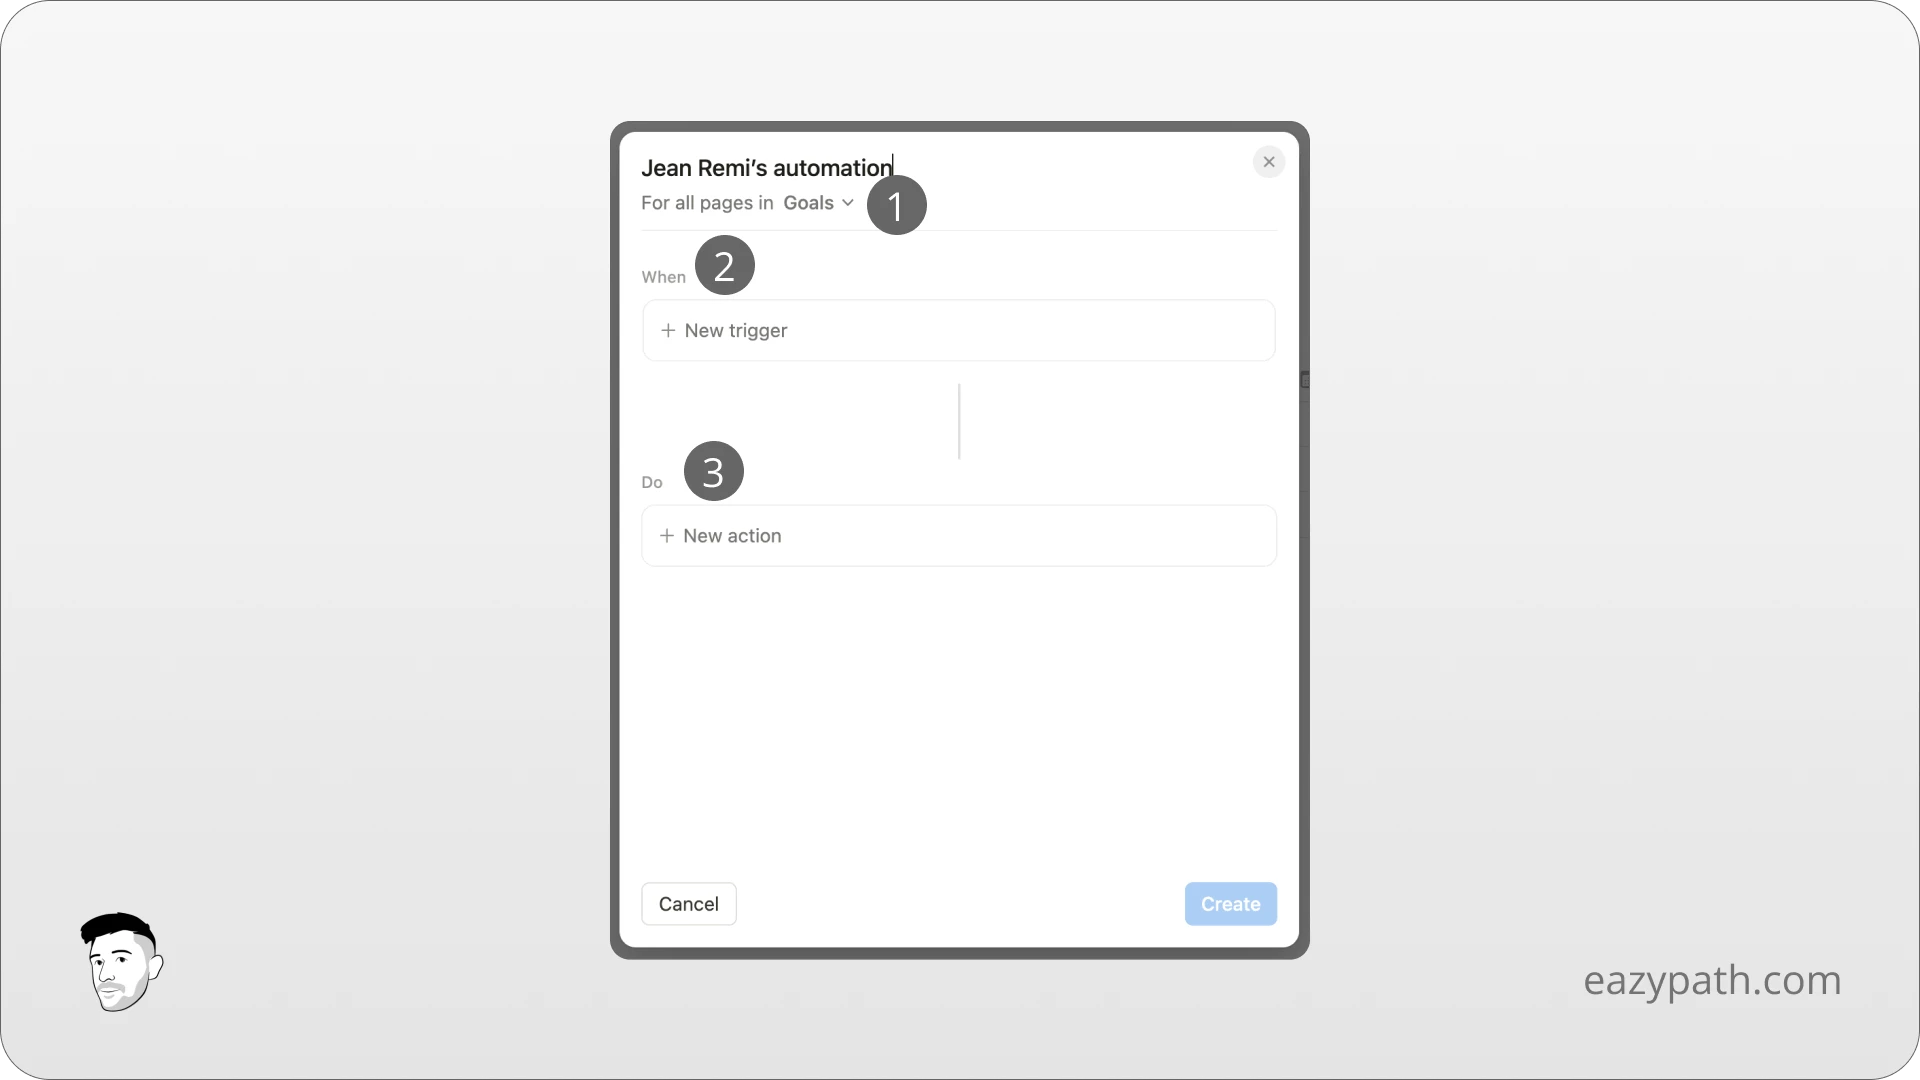
The first thing you will want to do is rename your automation with a comprehensive name, like the action the automation is supposed to do.
For example, if your automation automatically sets an achievement date when your status changes from "In Progress" to "Done," you can name it "Set Achievement Date."
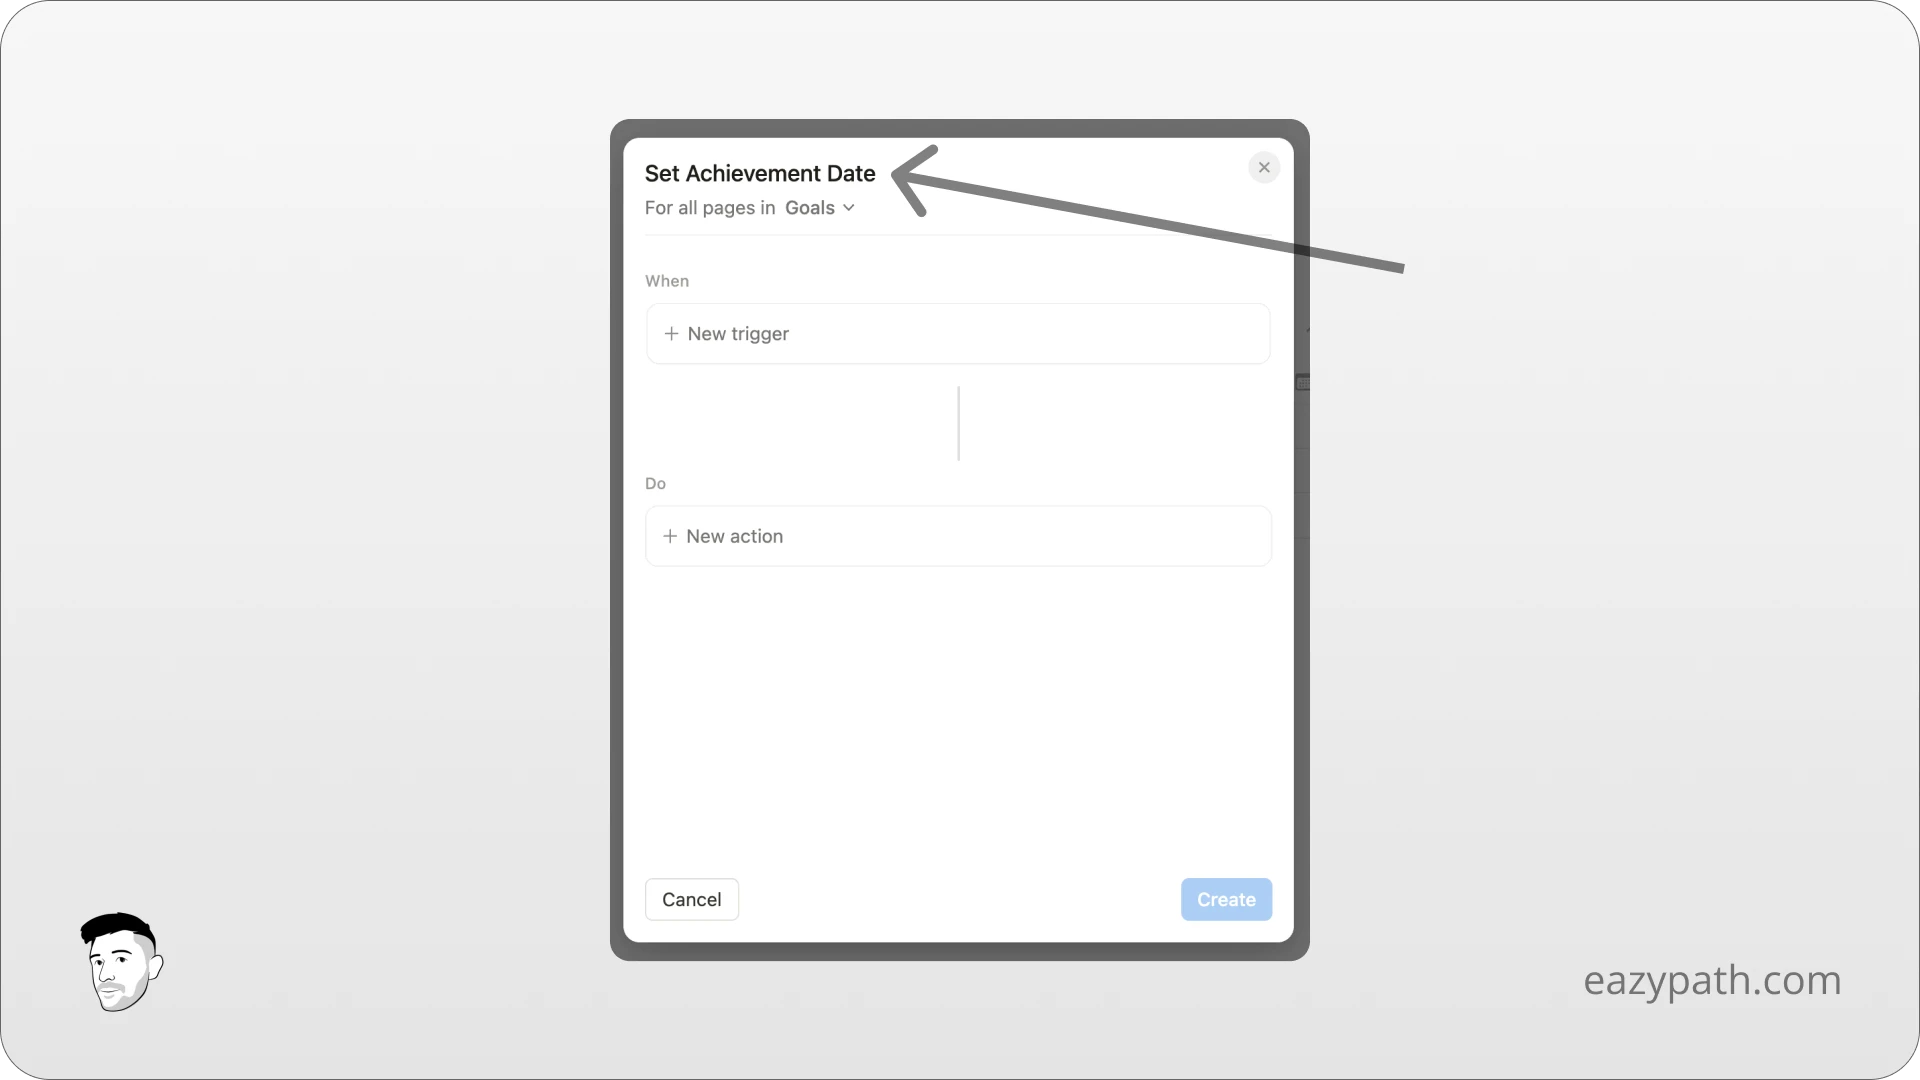
Now let's review each components.
Scope
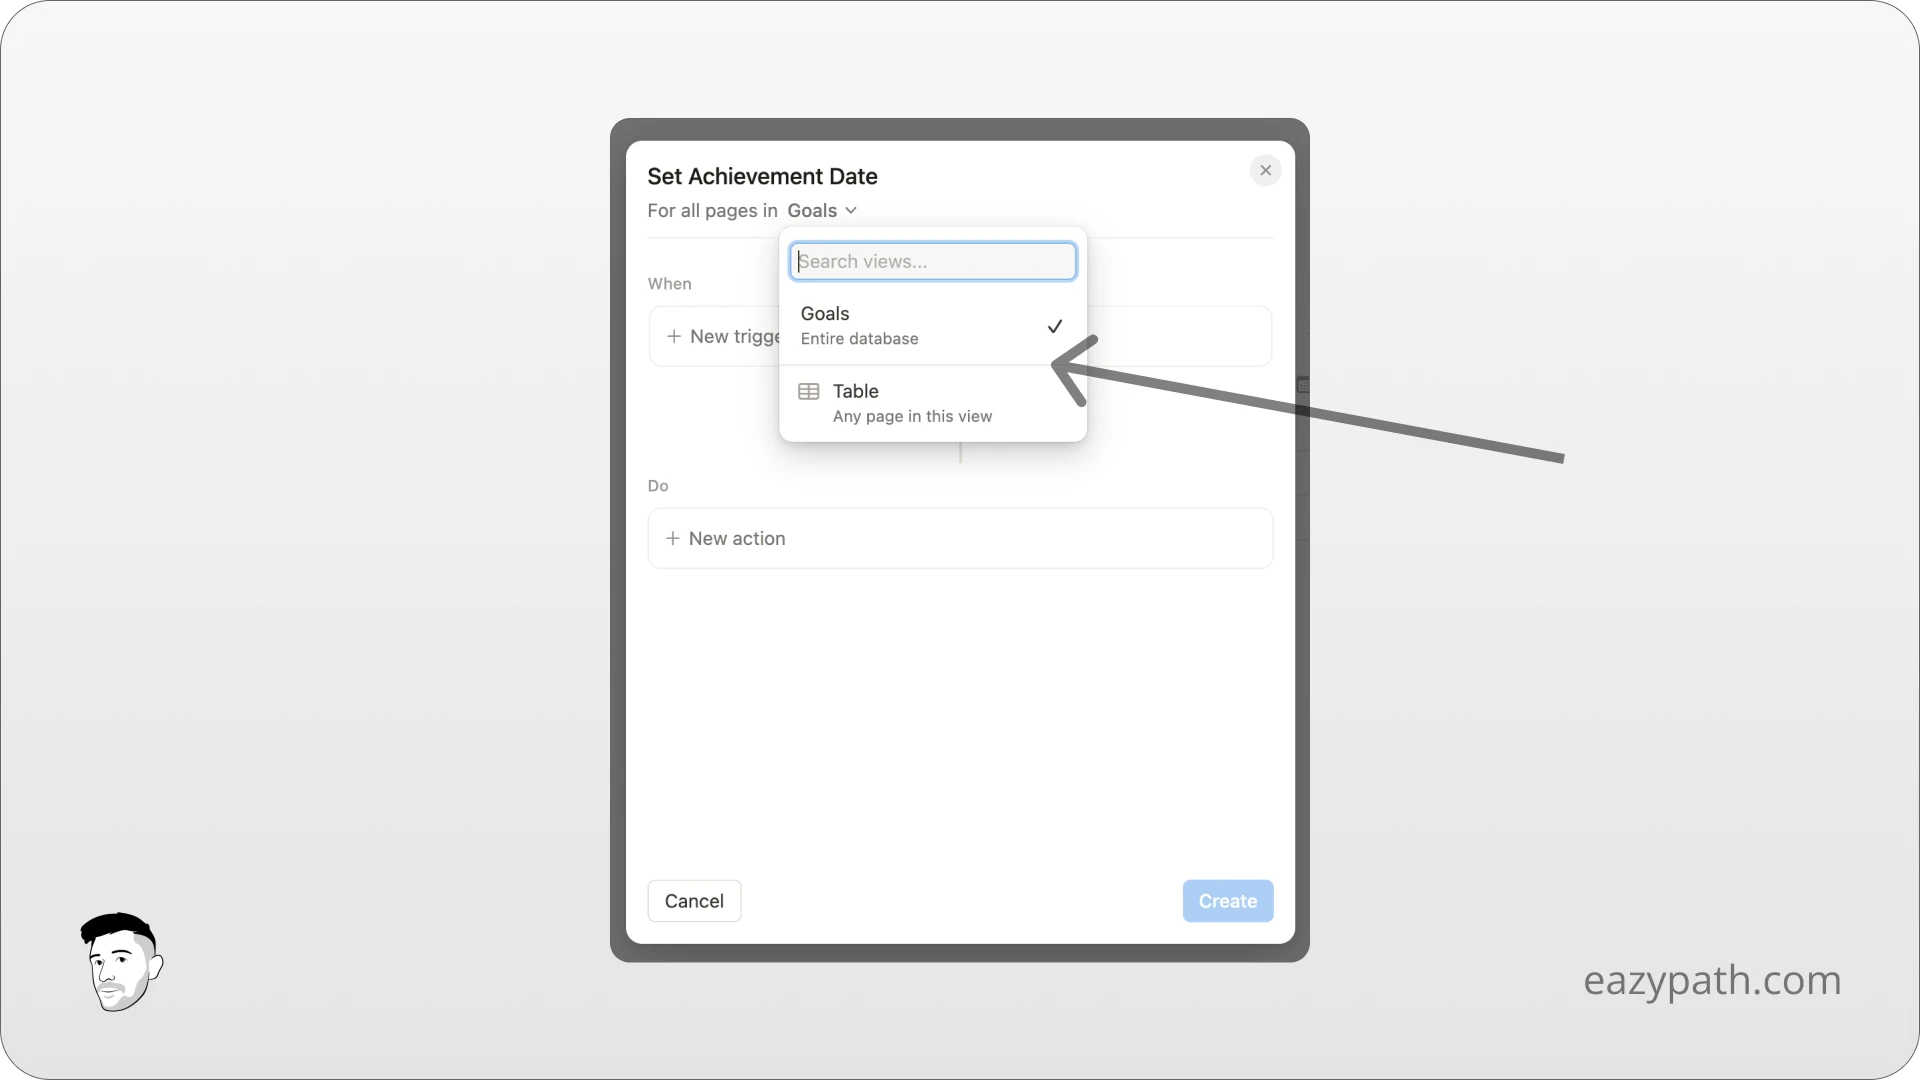
The scope defines whether your automation will be triggered for the whole database or a specific view.
By default, the automation is always set to the entire database.
To change the scope of your automation, simply click the "For all pages" section. You will see that you have the choice between "Entire database" or "Any page in this view".
Trigger
Notion database automations have three different type of triggers:
Any property edited: the automation will be triggered when any of the properties in the database is edited.
Page added: the automation will be triggered when a new page is added to the database.
Property: the automation will be triggered when a specific property is edited.
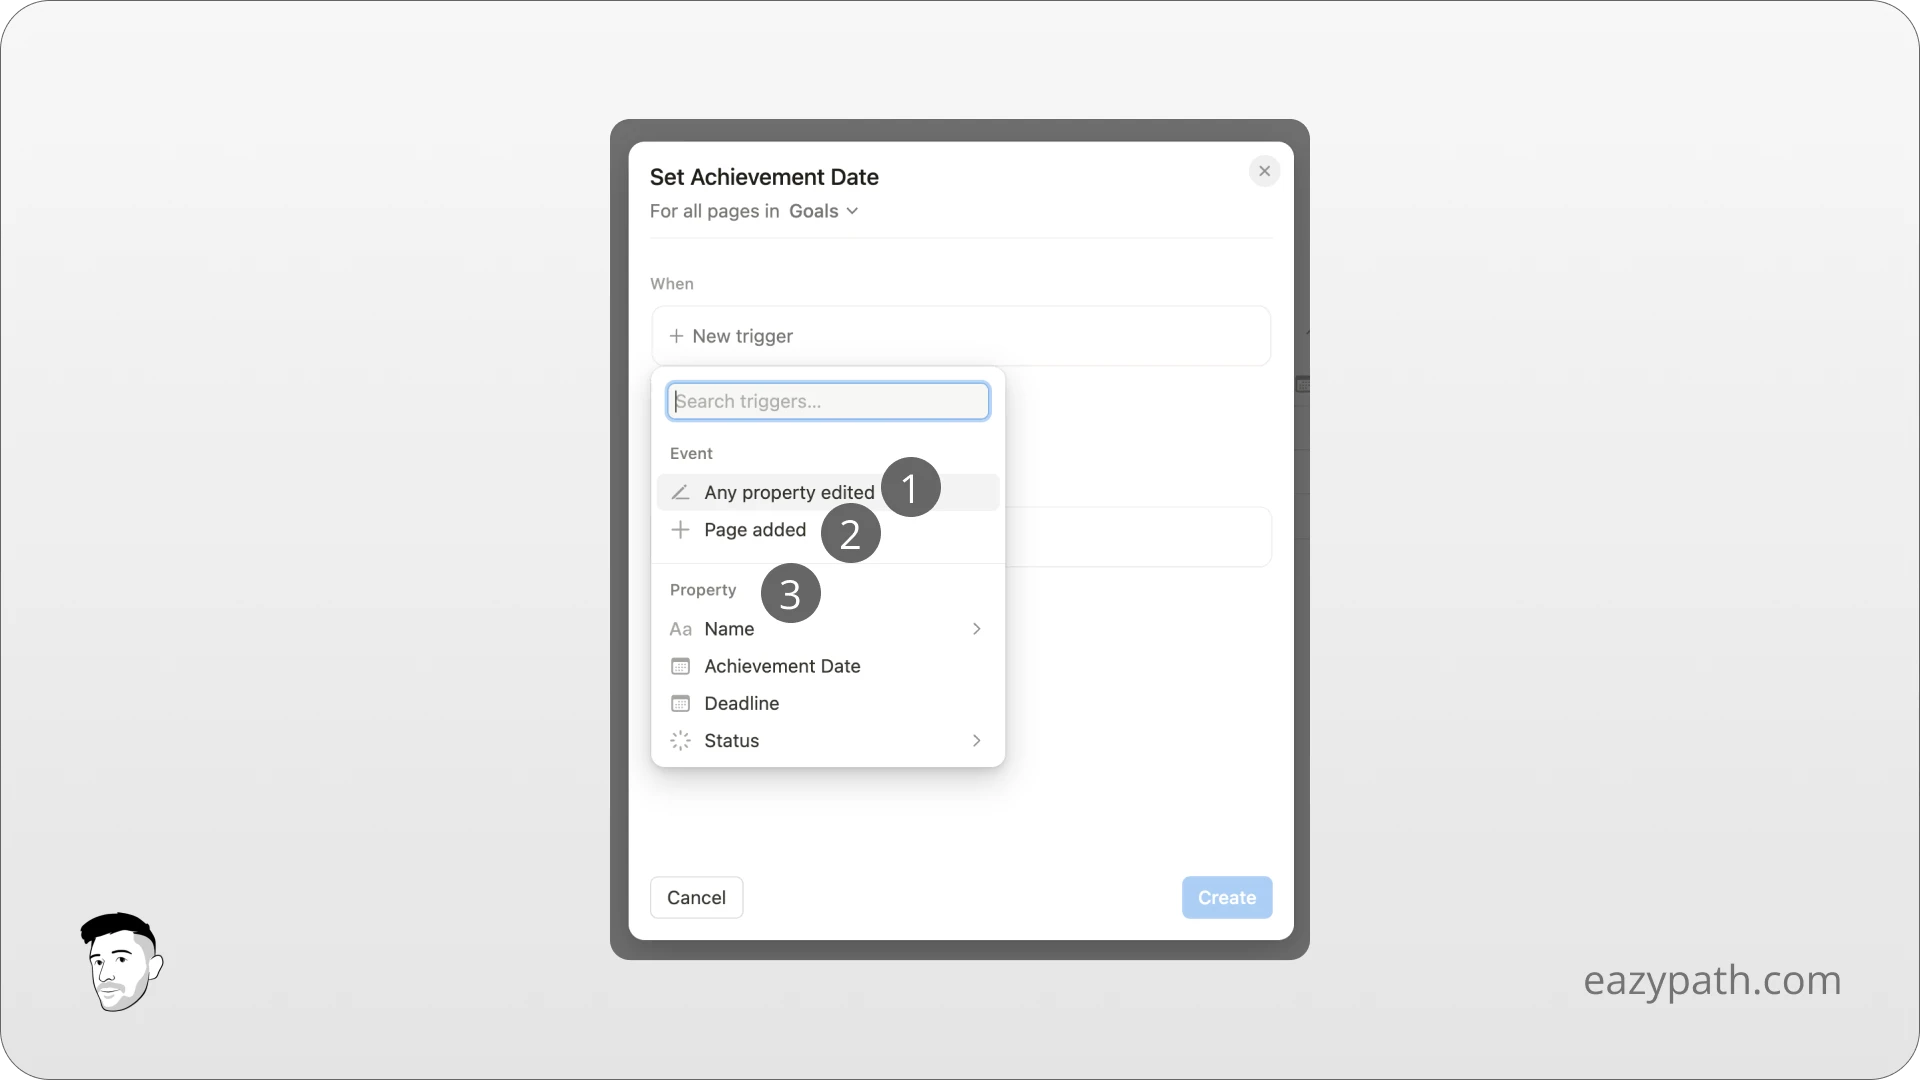
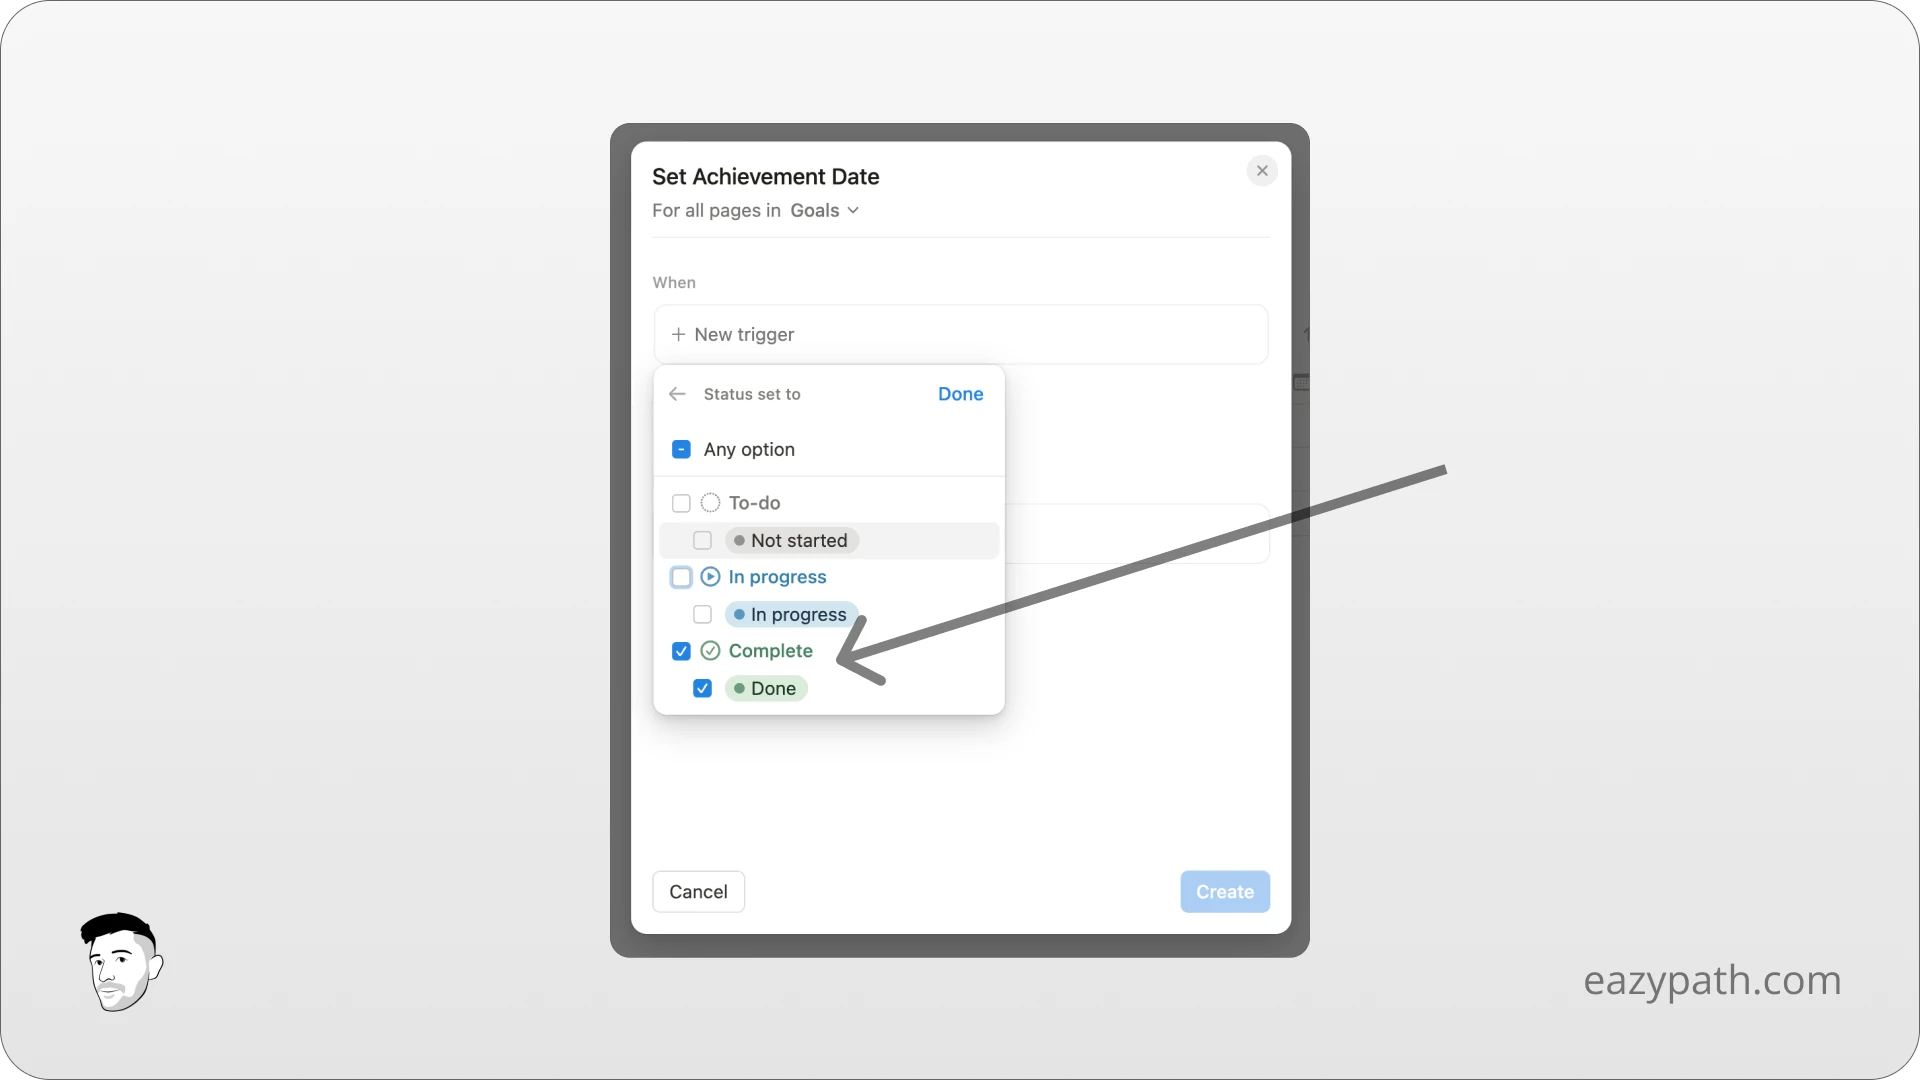
For most of the properties, they'll trigger when any edit is made to them. But for the "select," "multi-select," and "status" properties, you can be more specific. You can specify which "option" or "status" will trigger the automation.
If we take the example "Set Achievement Date," we could, for example, define the trigger as "When the status is changed to Done." So, to do so, you will select the property "Status" and then select the "Done" status.
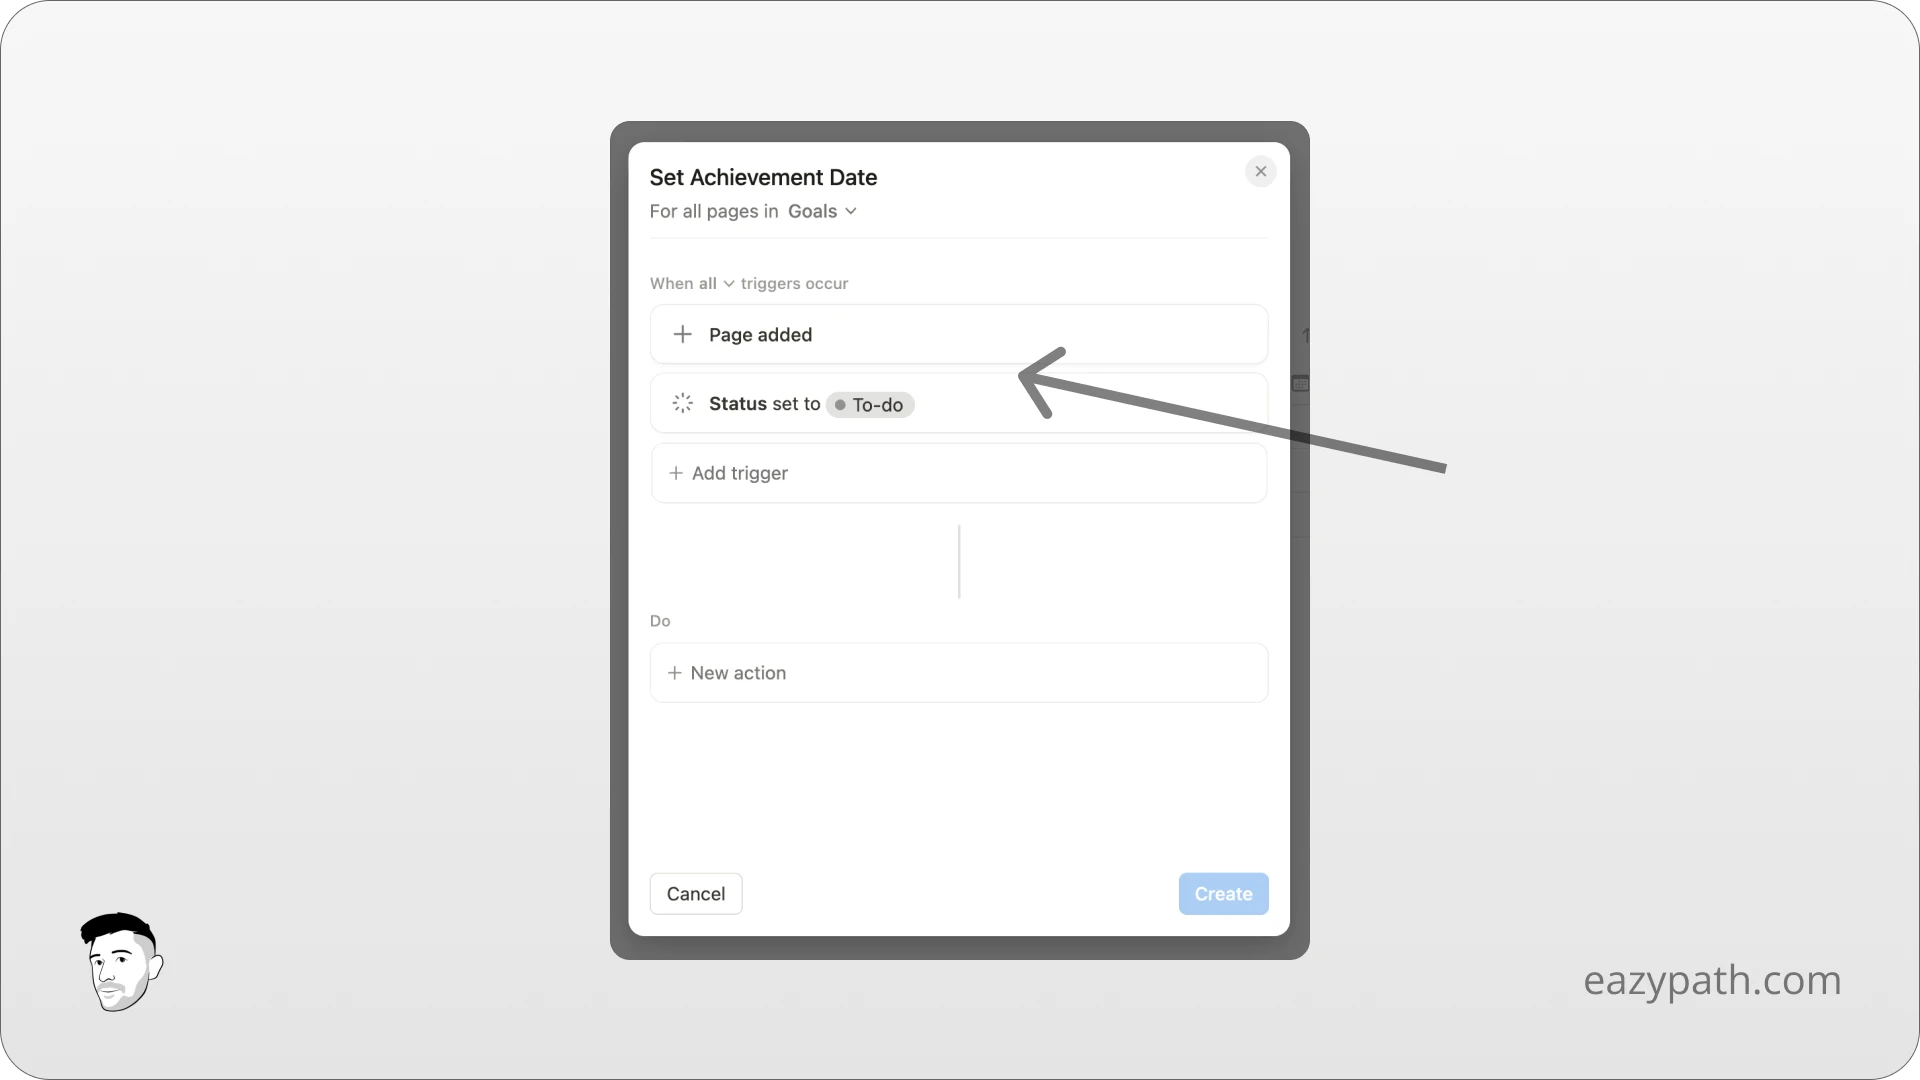
Of course, an automation can have multiple triggers. Note that when you have multiple triggers, the automation considers it as an OR.
For example, you could have 2 triggers: "Page added" OR "Status set to To-do".
Action
Now, this is where Notion database automations are becoming really powerful. When your automation is triggered, you can set various actions:
Edit property: edit another property on the same database.
Add page to: add a new page in another database.
Edit pages in: edit pages in another database.
Send notification to: send a Notion notification to a user.
Send email to: send an email.
Send Slack notification to: send a Slack notification to a channel in your configured Slack account.
Define variables: define custom variables you can use in other actions.
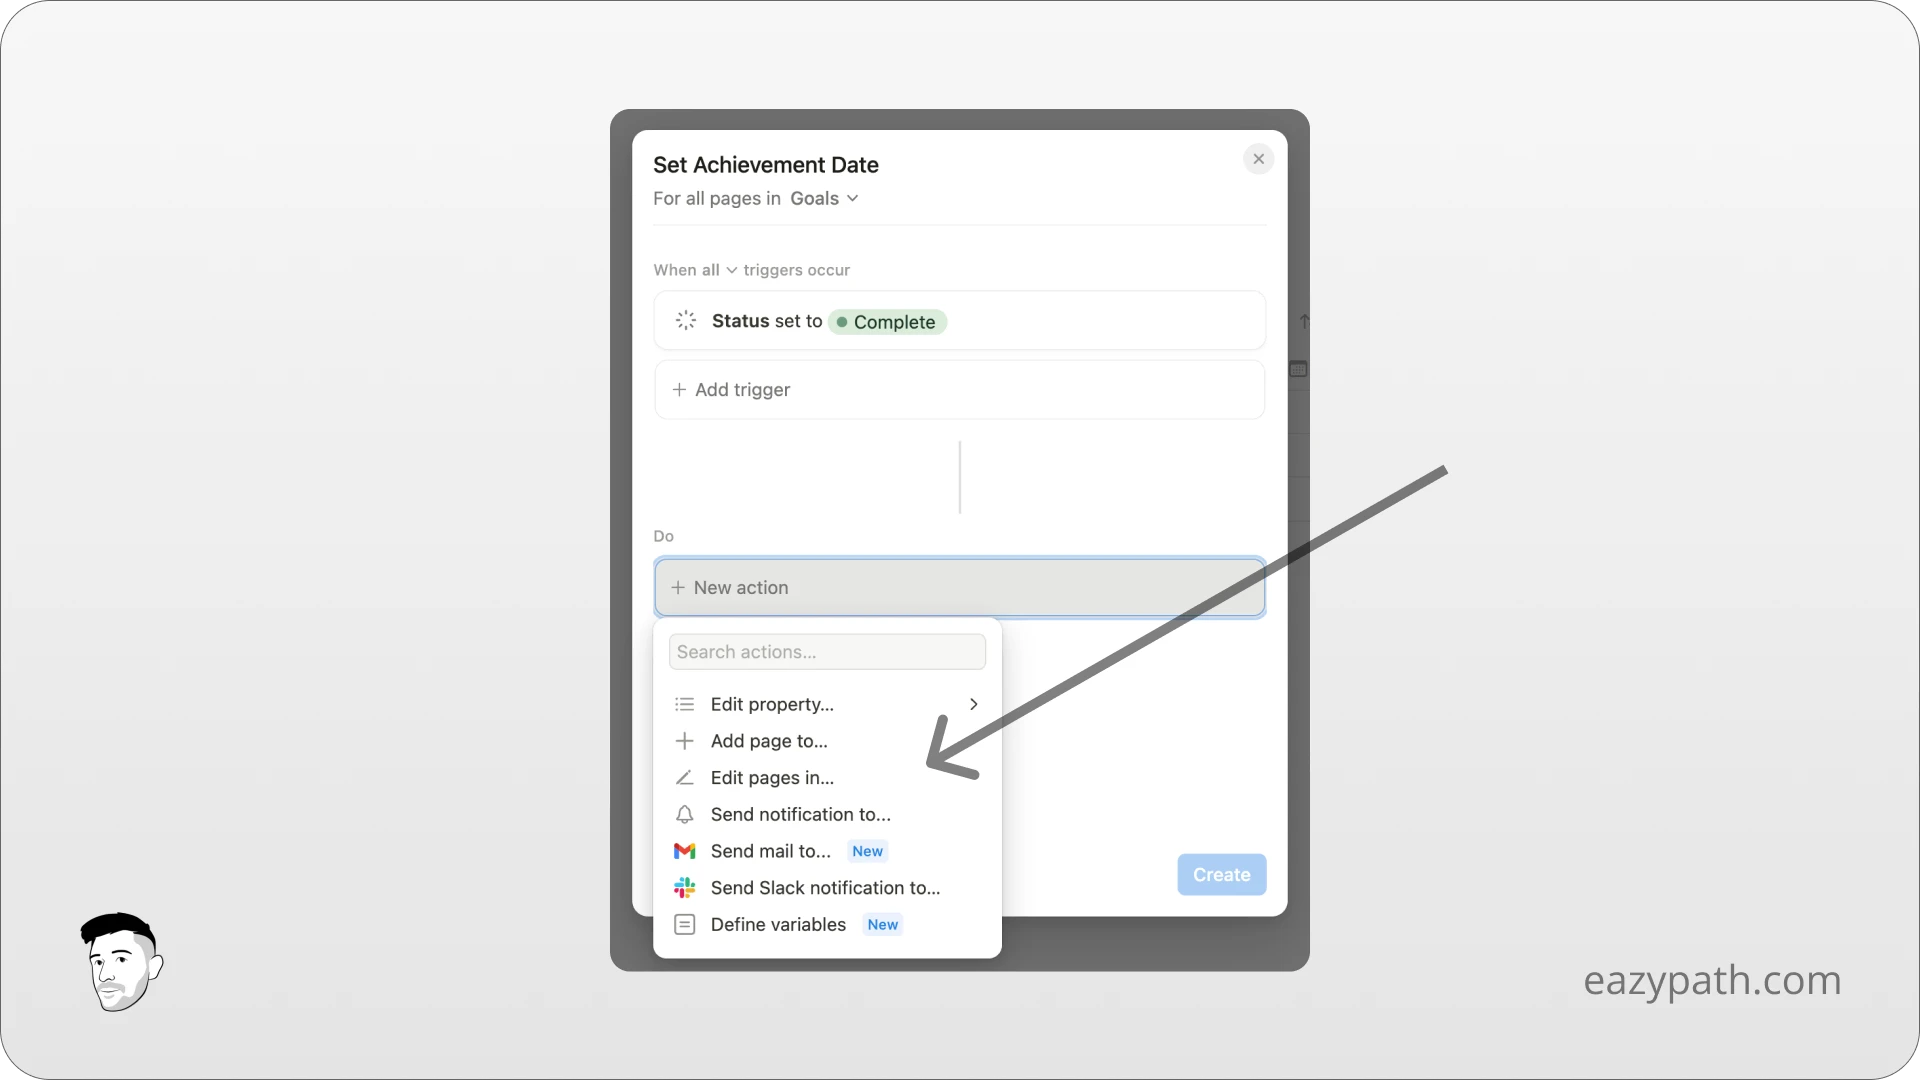
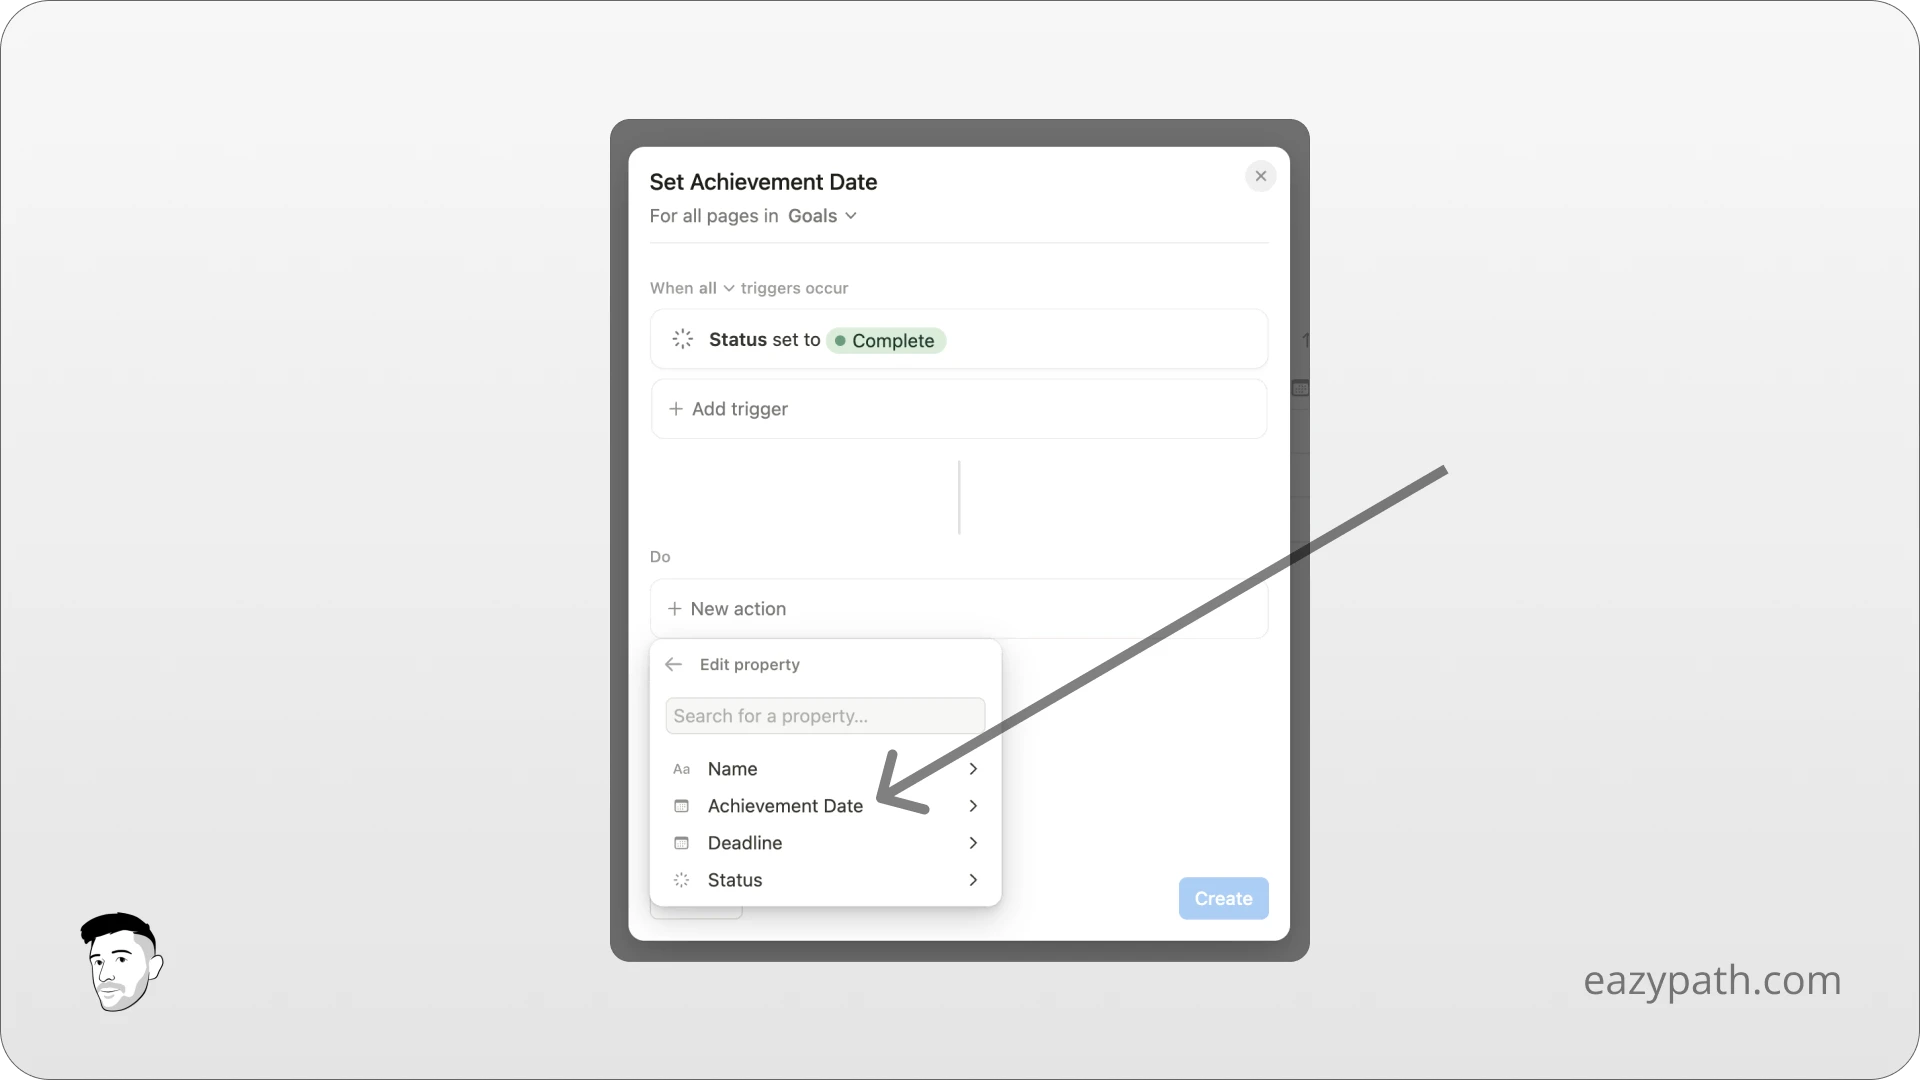
To complete the example we started before (Set Achievement Date), we will select the "Edit property" option and then choose the property "Achievement Date".
Here you will see several options related to a date property. Either set the date or time to the moment of the trigger, set a specific date, or use a custom formula to set a date. We will look at the custom formula part in more detail later as it's quite advanced.
For now, we will just set the property to the date triggered.
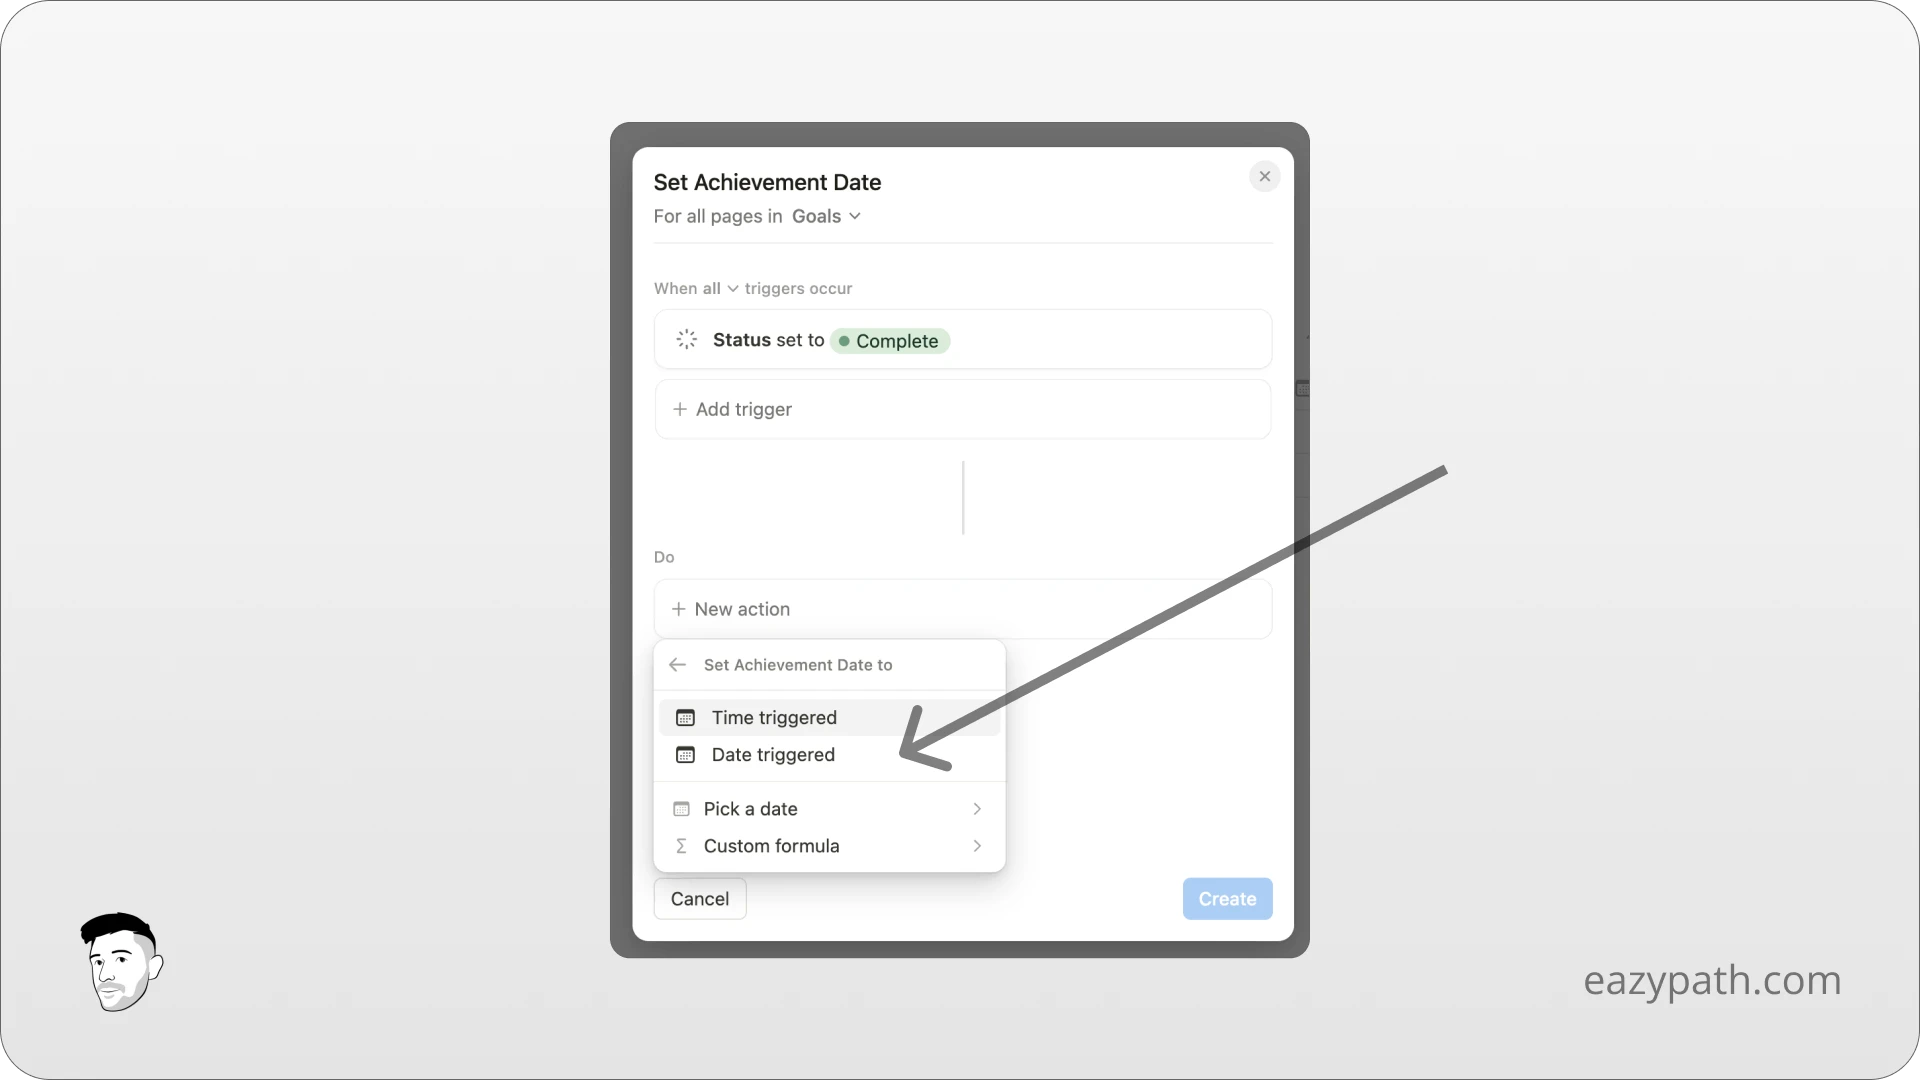
That's all! You can click on the "Create" button and your automation is ready to start!
Now, this was a really simple example to introduce you to Notion automations. In the next section, we will explore specific use cases where you can observe other types of actions and see how powerful automations can be.
Specific Uses Cases of Notion Database Automations
In this section, we will see step by step some real use cases of Notion automations to try to cover most of the actions available:
Link an expense to a monthly report: We will link an expense item to a monthly report based on the date of the expense.
Send an email after a form is filled: We will send an email after a Notion form is filled out.
Create recurring tasks: We will create a task that repeats weekly once it has been completed.
Link an Expense to a Monthly Report
First of all, we will try to link an expense to a monthly report regarding the date of the expense.
Note that I have include this automation myself in my Finance Tracker (view Finance Tracker).
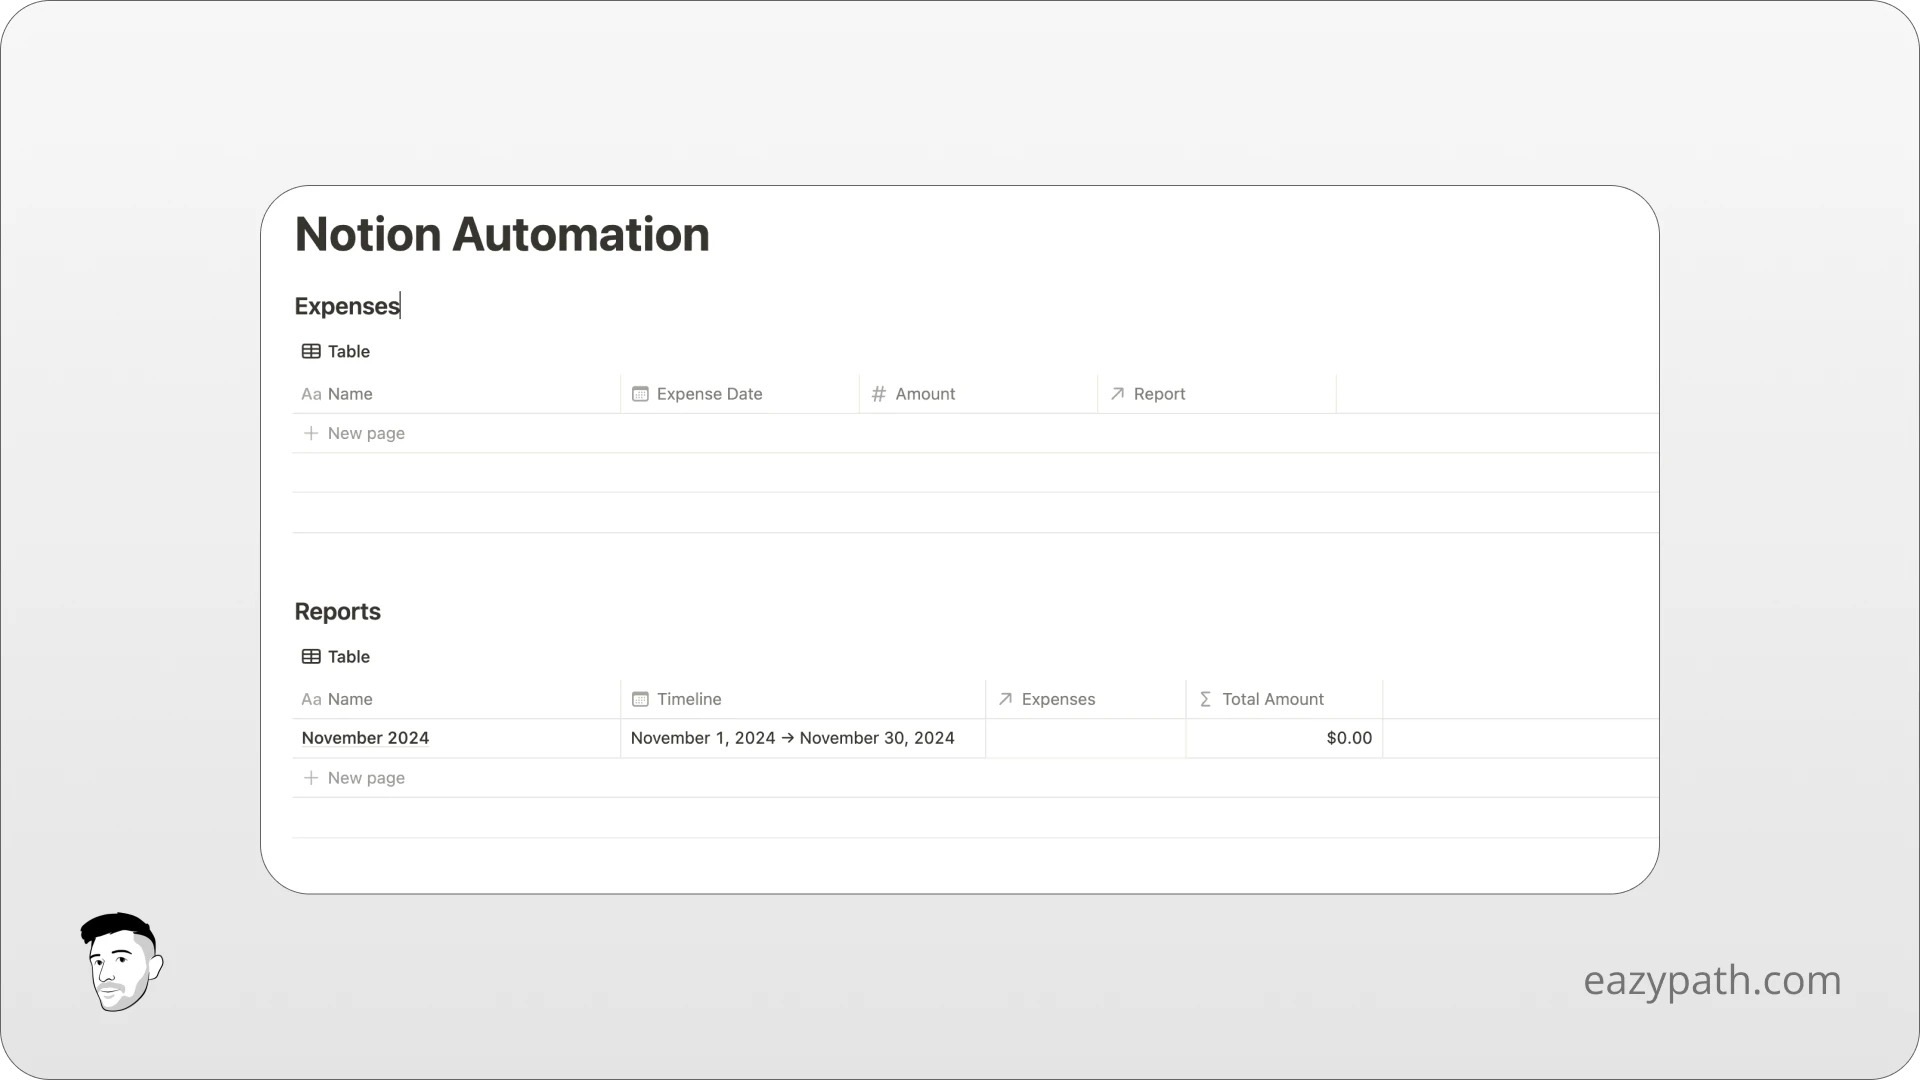
For this, we will need two databases that we will keep simple.
Expenses database with:
Expense Date as a date property (Important: set this date to today by default)
Amount as a number property
Report as a relation property of the Report database
Reports database with:
Timeline as a date property with start and end date
Expenses as a relation property of the Expense database
Total Amount as a formula property
For the total amount you can enter the following formula:
Expenses.map(current.Amount).sum()
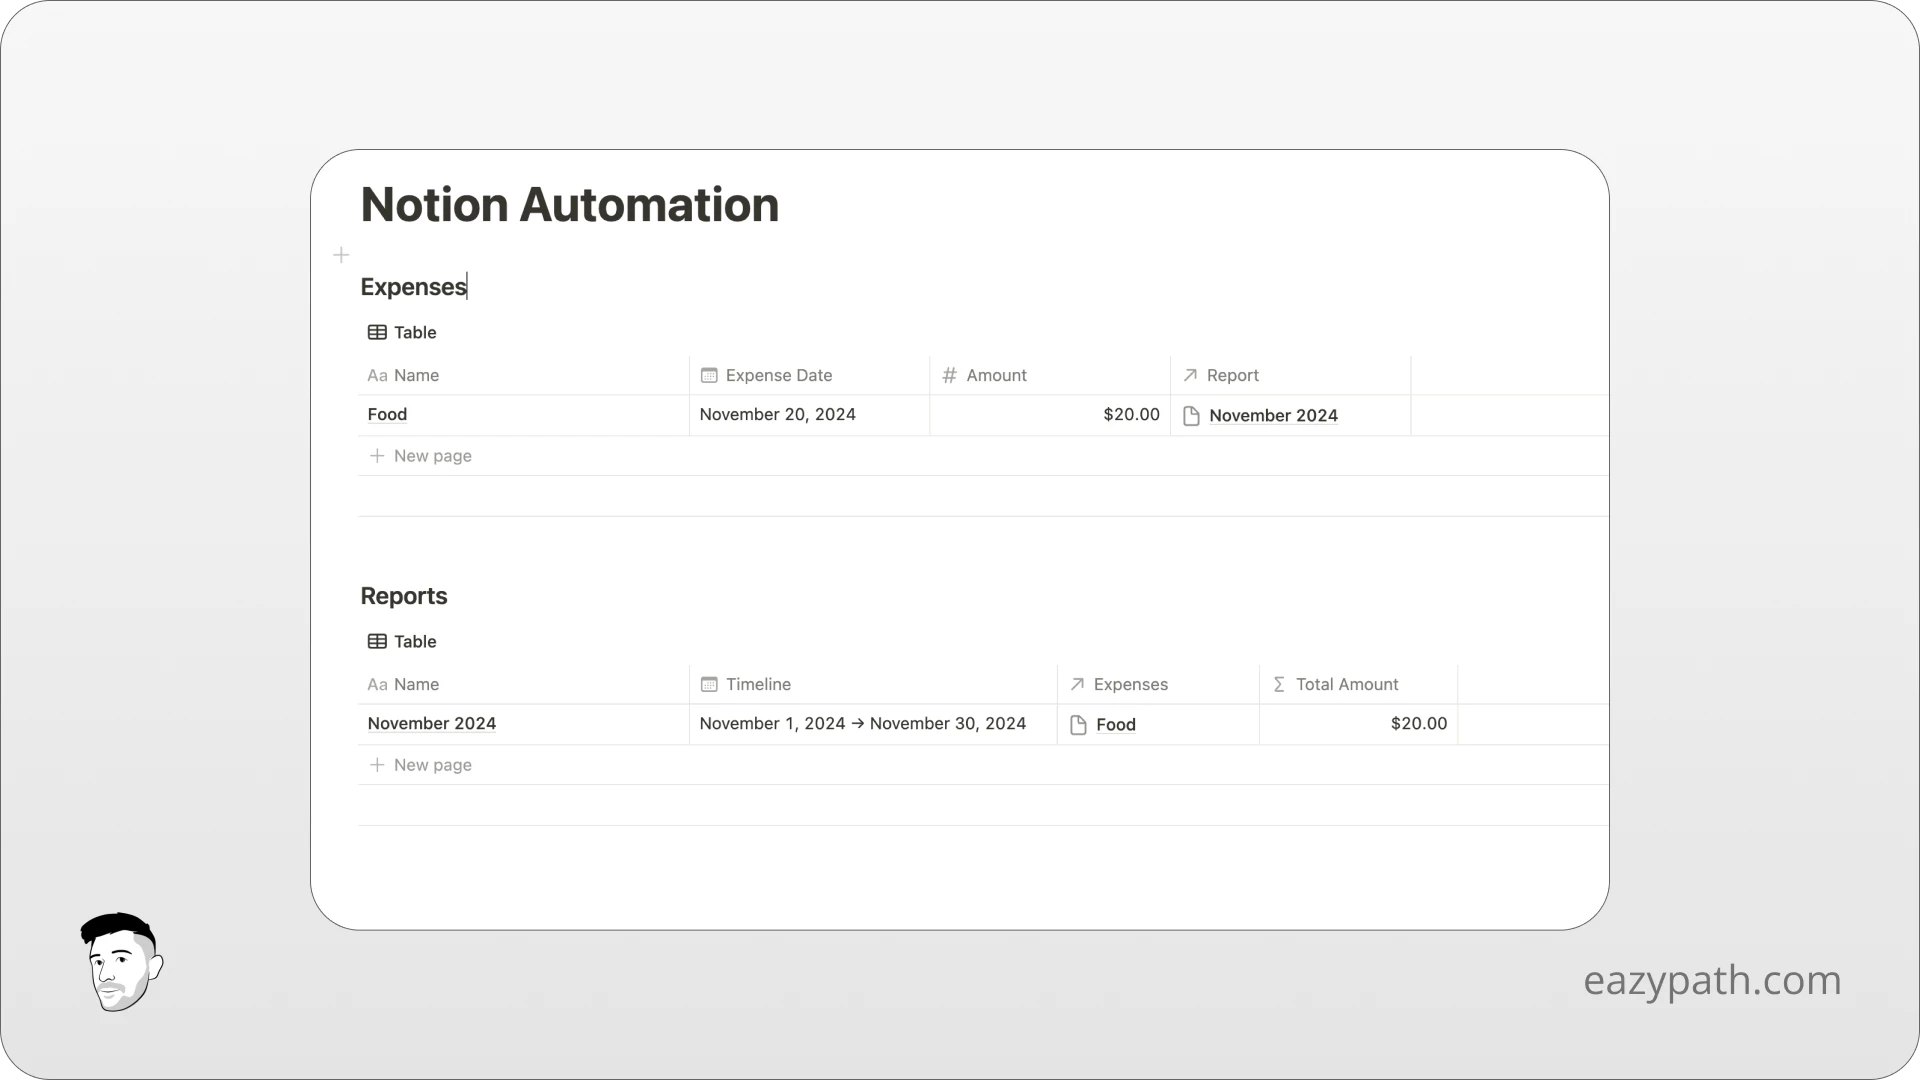
Let's create a report of the current month. You should now have something like this:
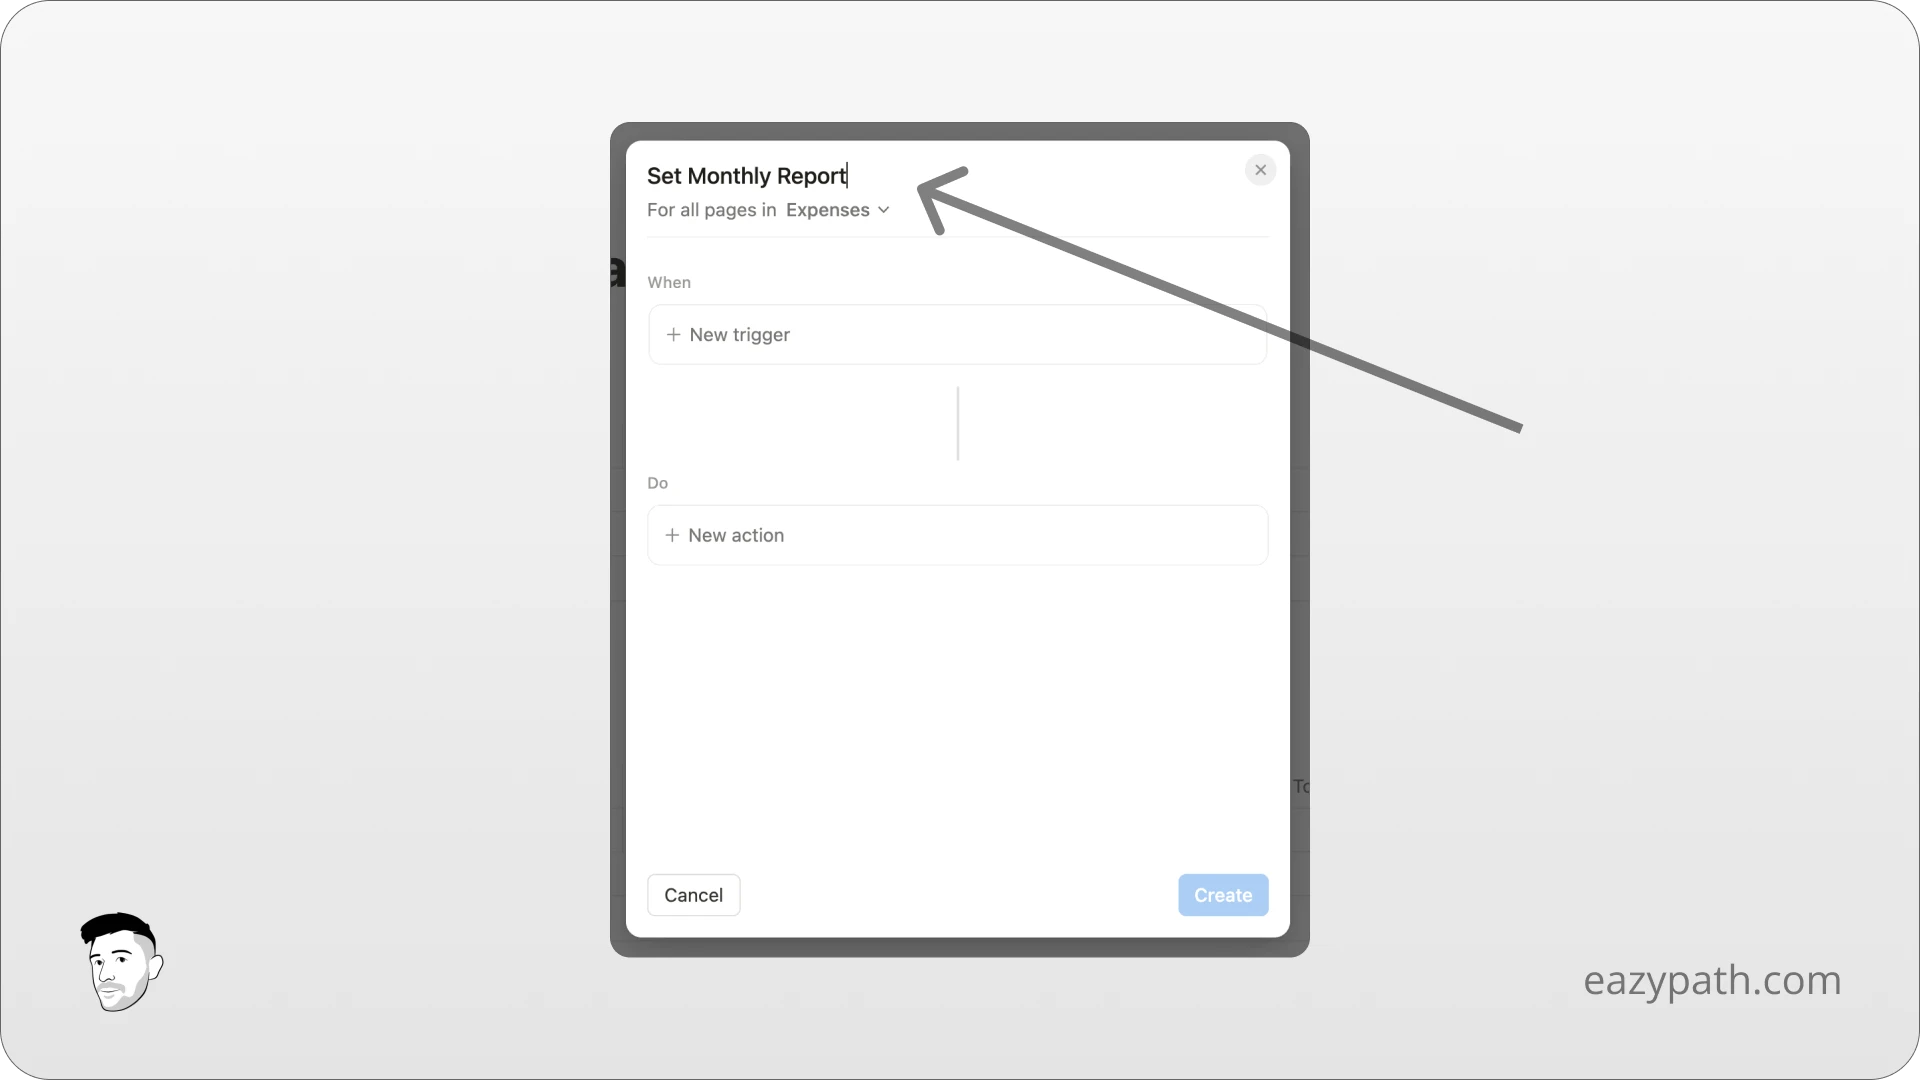
Now let's begin the automation. Like you know, simply press the lightning button on the Expenses database and name your automation "Set Monthly Report." Let the scope be "all pages in Expenses."
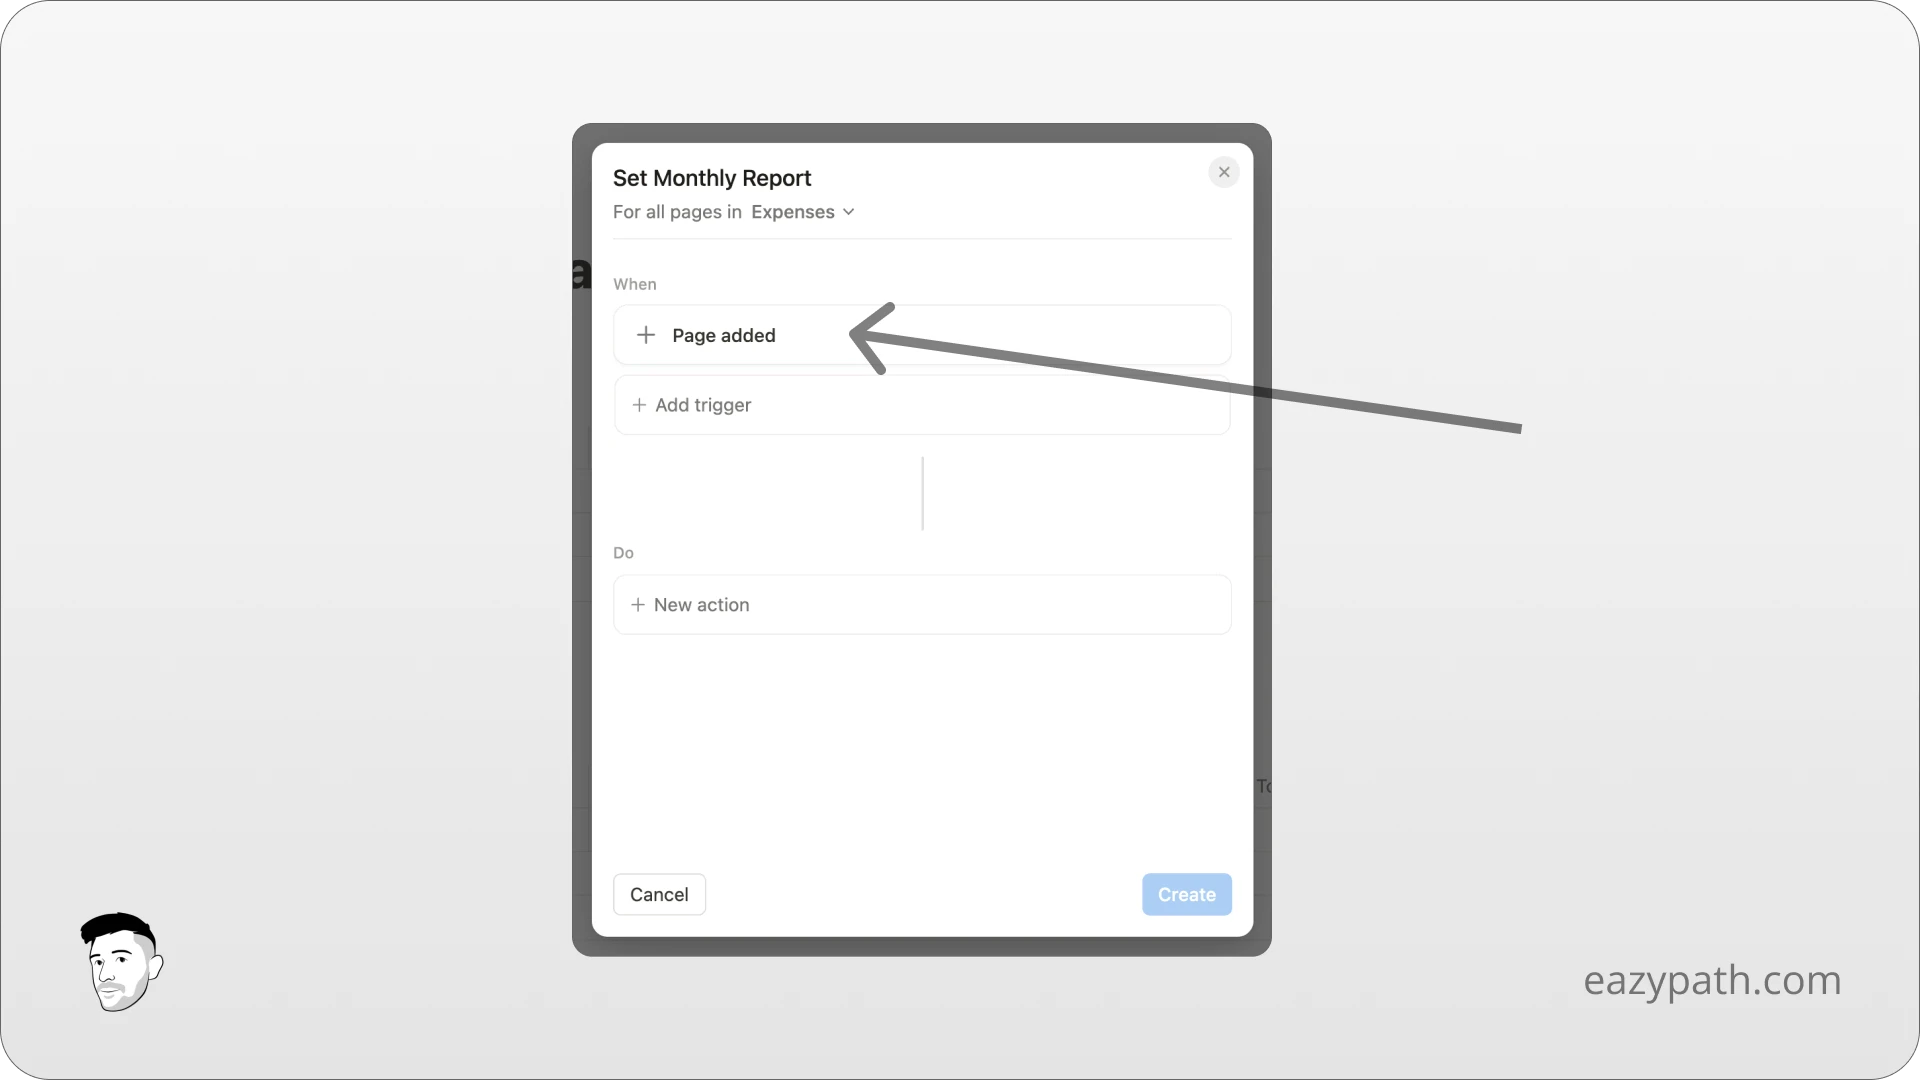
For the trigger, we will set it to "Page added" as we want the report to be linked when we create our expense.
For the Action, we will choose the option "Edit pages in" and select the "Reports" database.
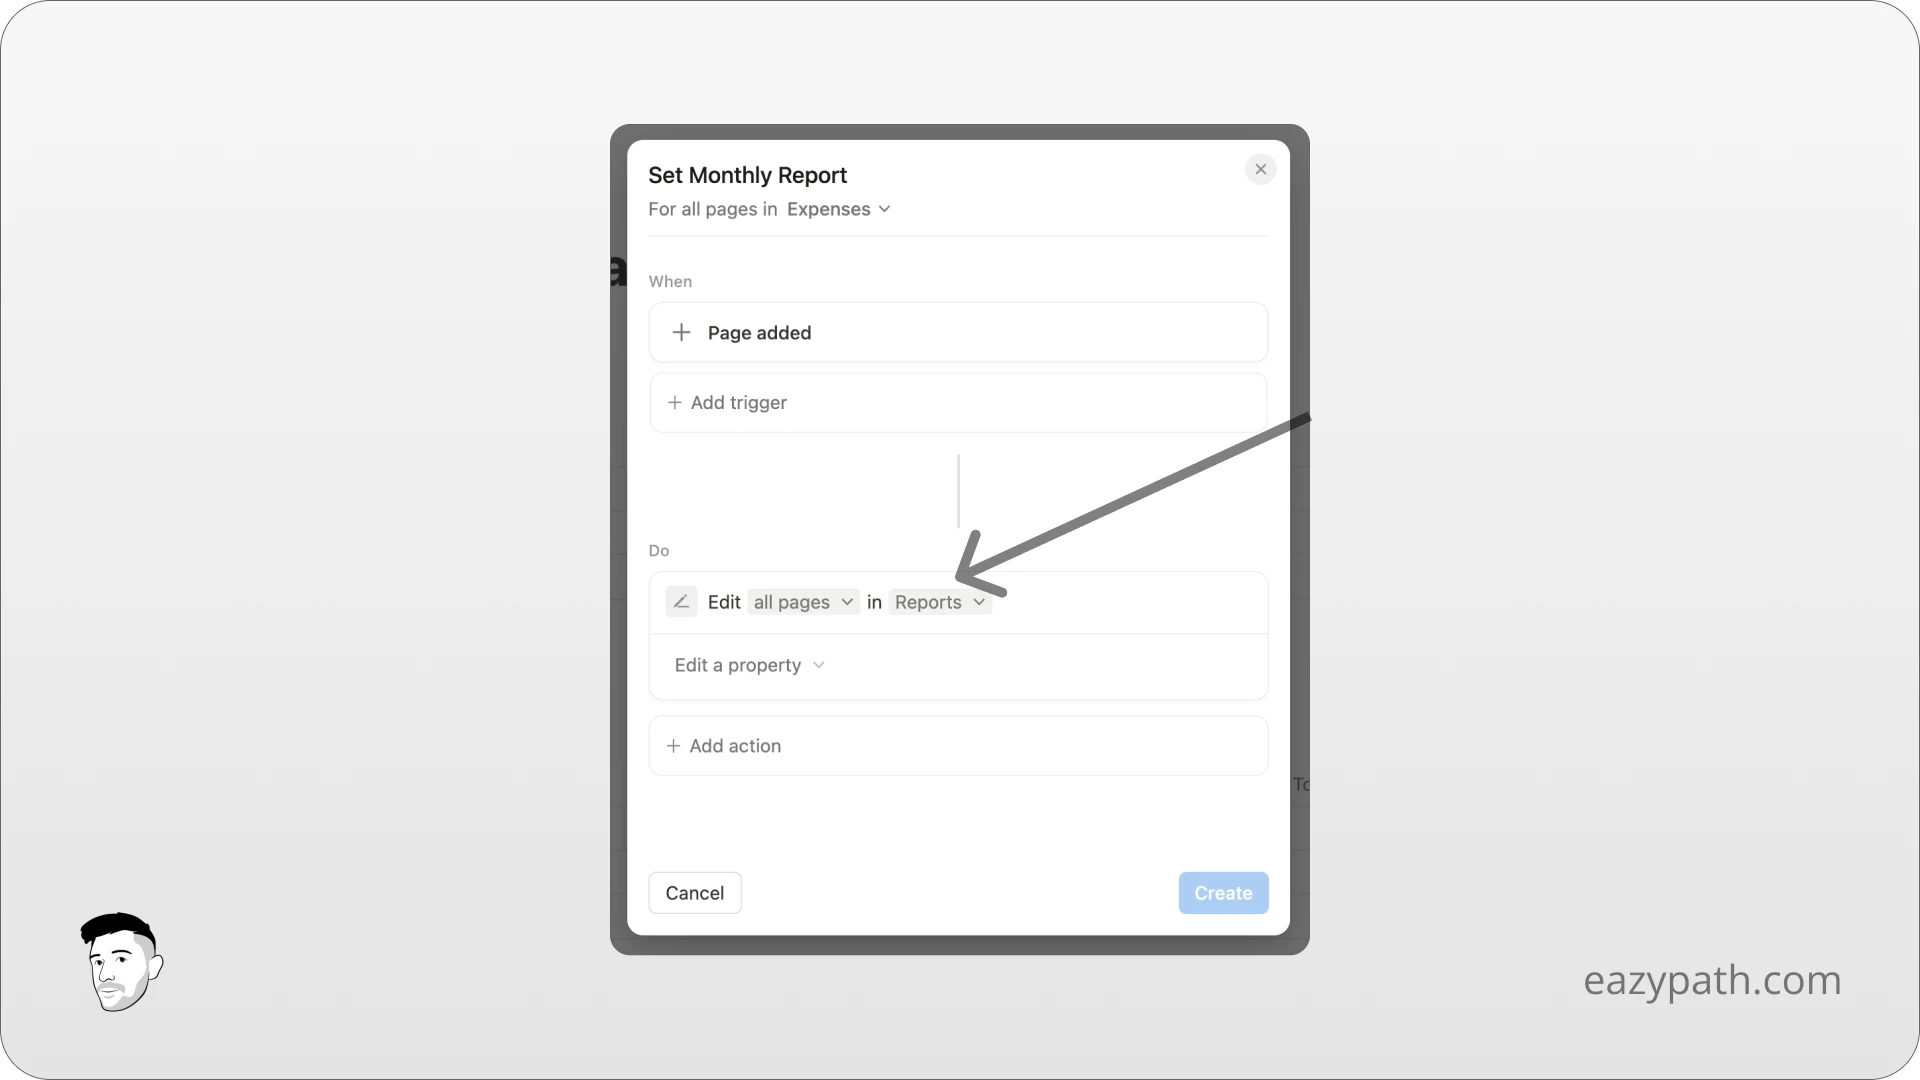
Now we don't want to edit all the pages inside the report database, but only the one that matches the date we create the expense. To do so, we will click on the "all pages" and set a filter like this:
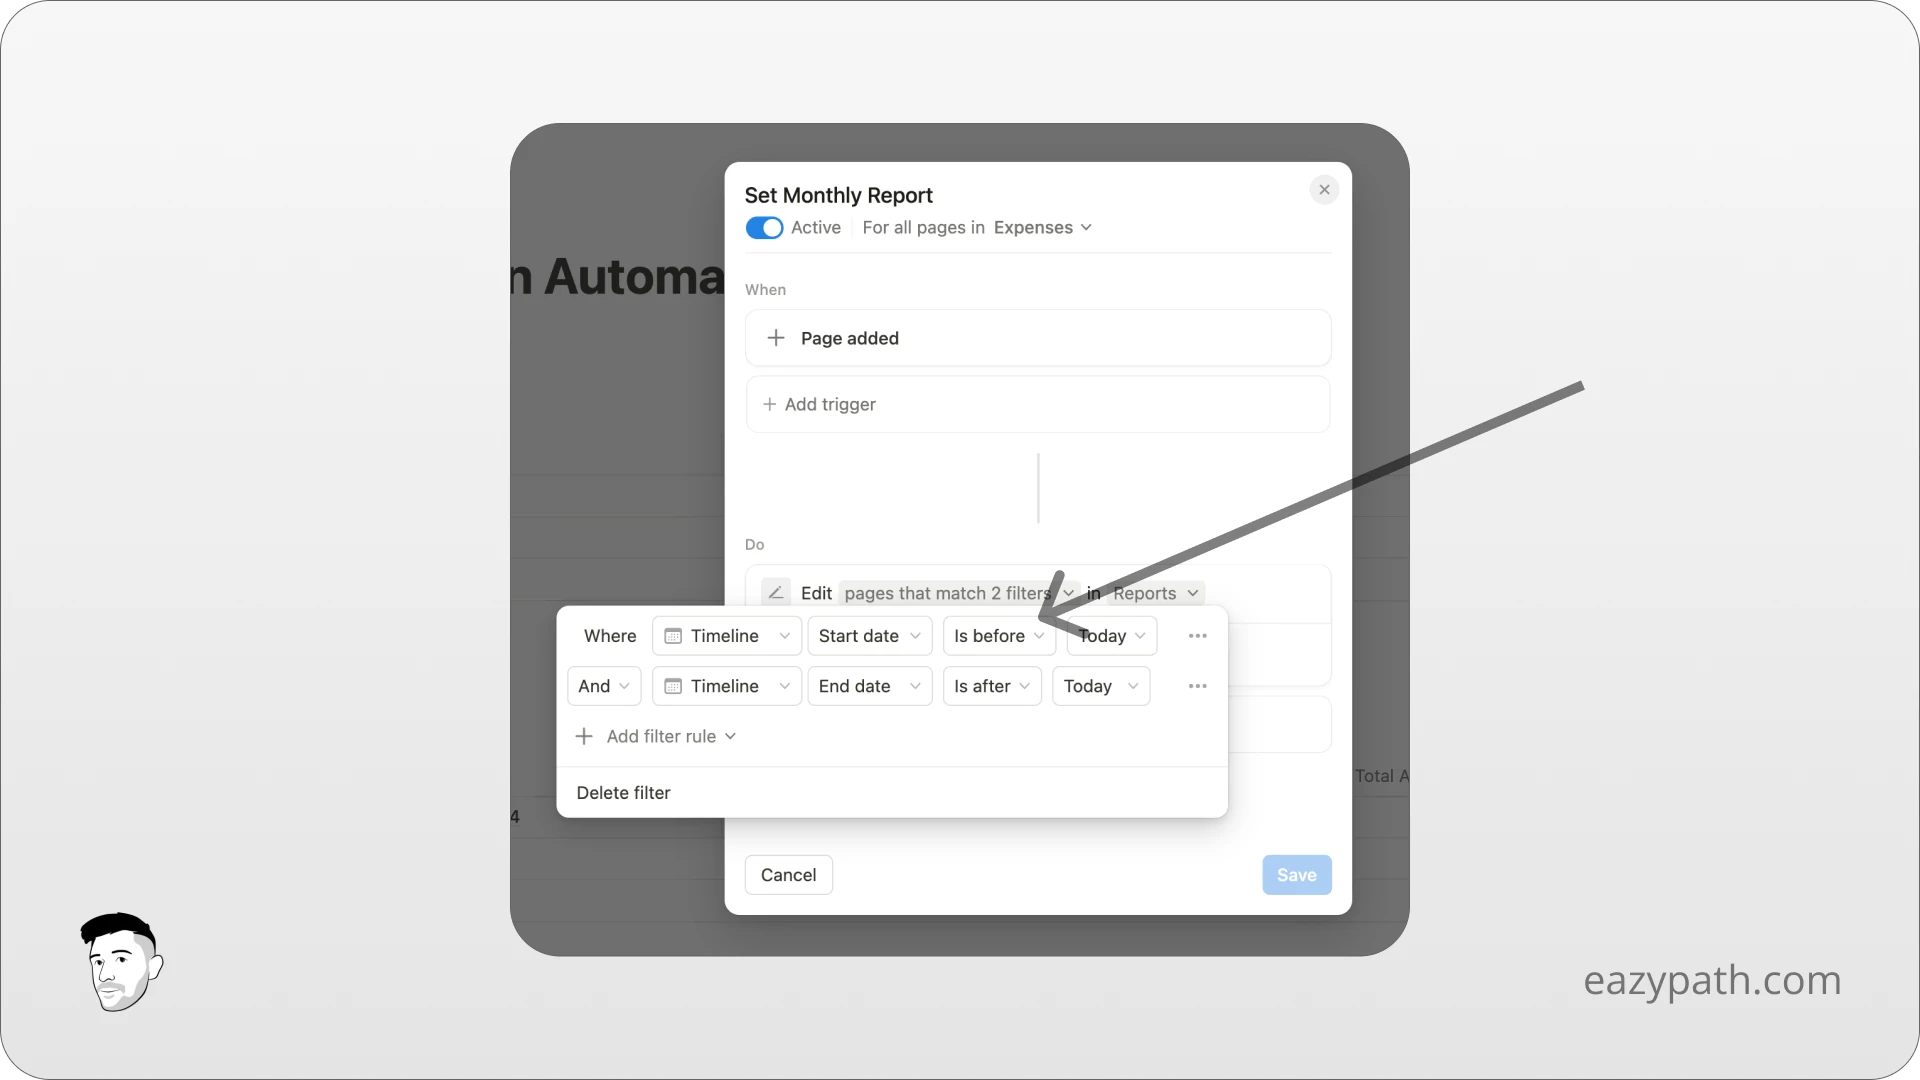
To finish, we need to choose the property we will edit. We will choose the "Expenses" property, select "add" (to add the page), and choose the page we just triggered.
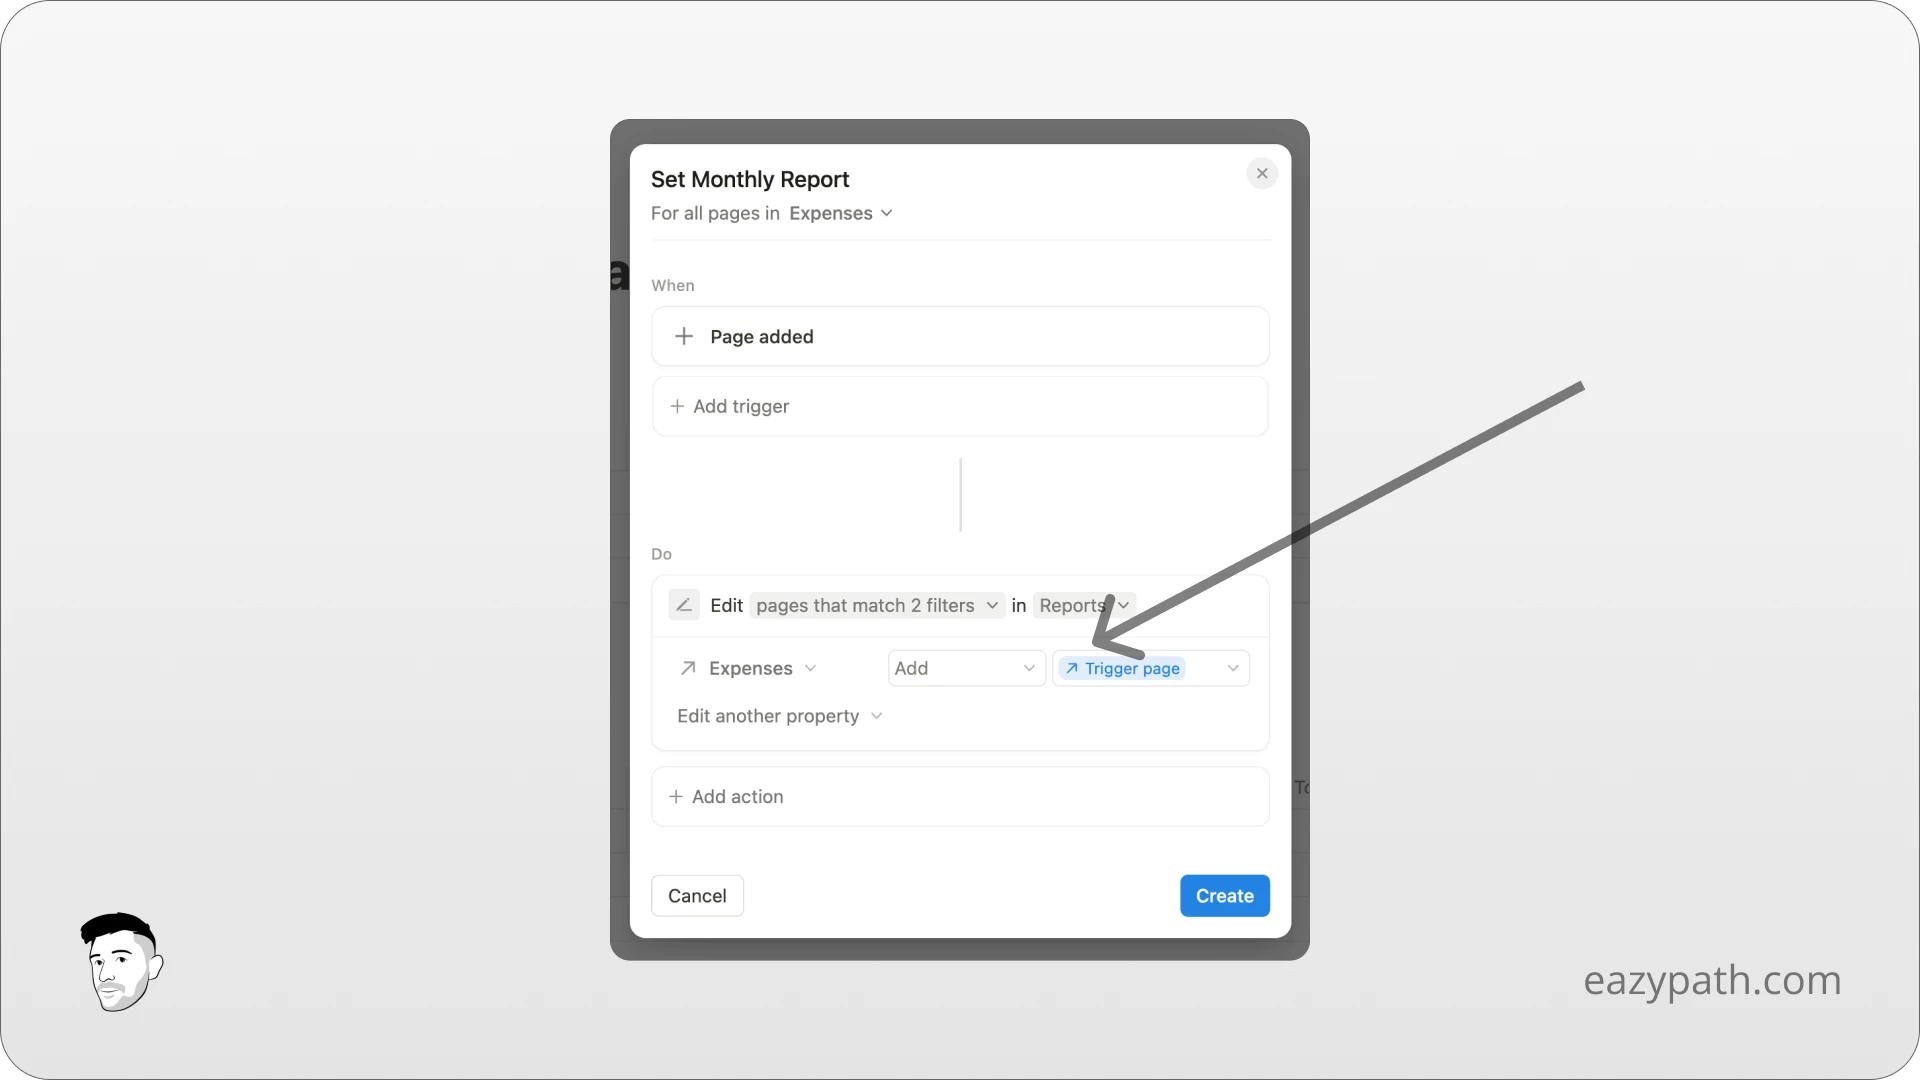
That's all! Now when you add a new expense, it will automatically linked this one to the current monthly report.
To make it better, consider setting the expense date to today by default.
Try it, wait a few seconds, and you will see your expense linked to your report.
Send an Email After a Form is Filled
Now, let's try to send an email from a Notion form that has just been filled.
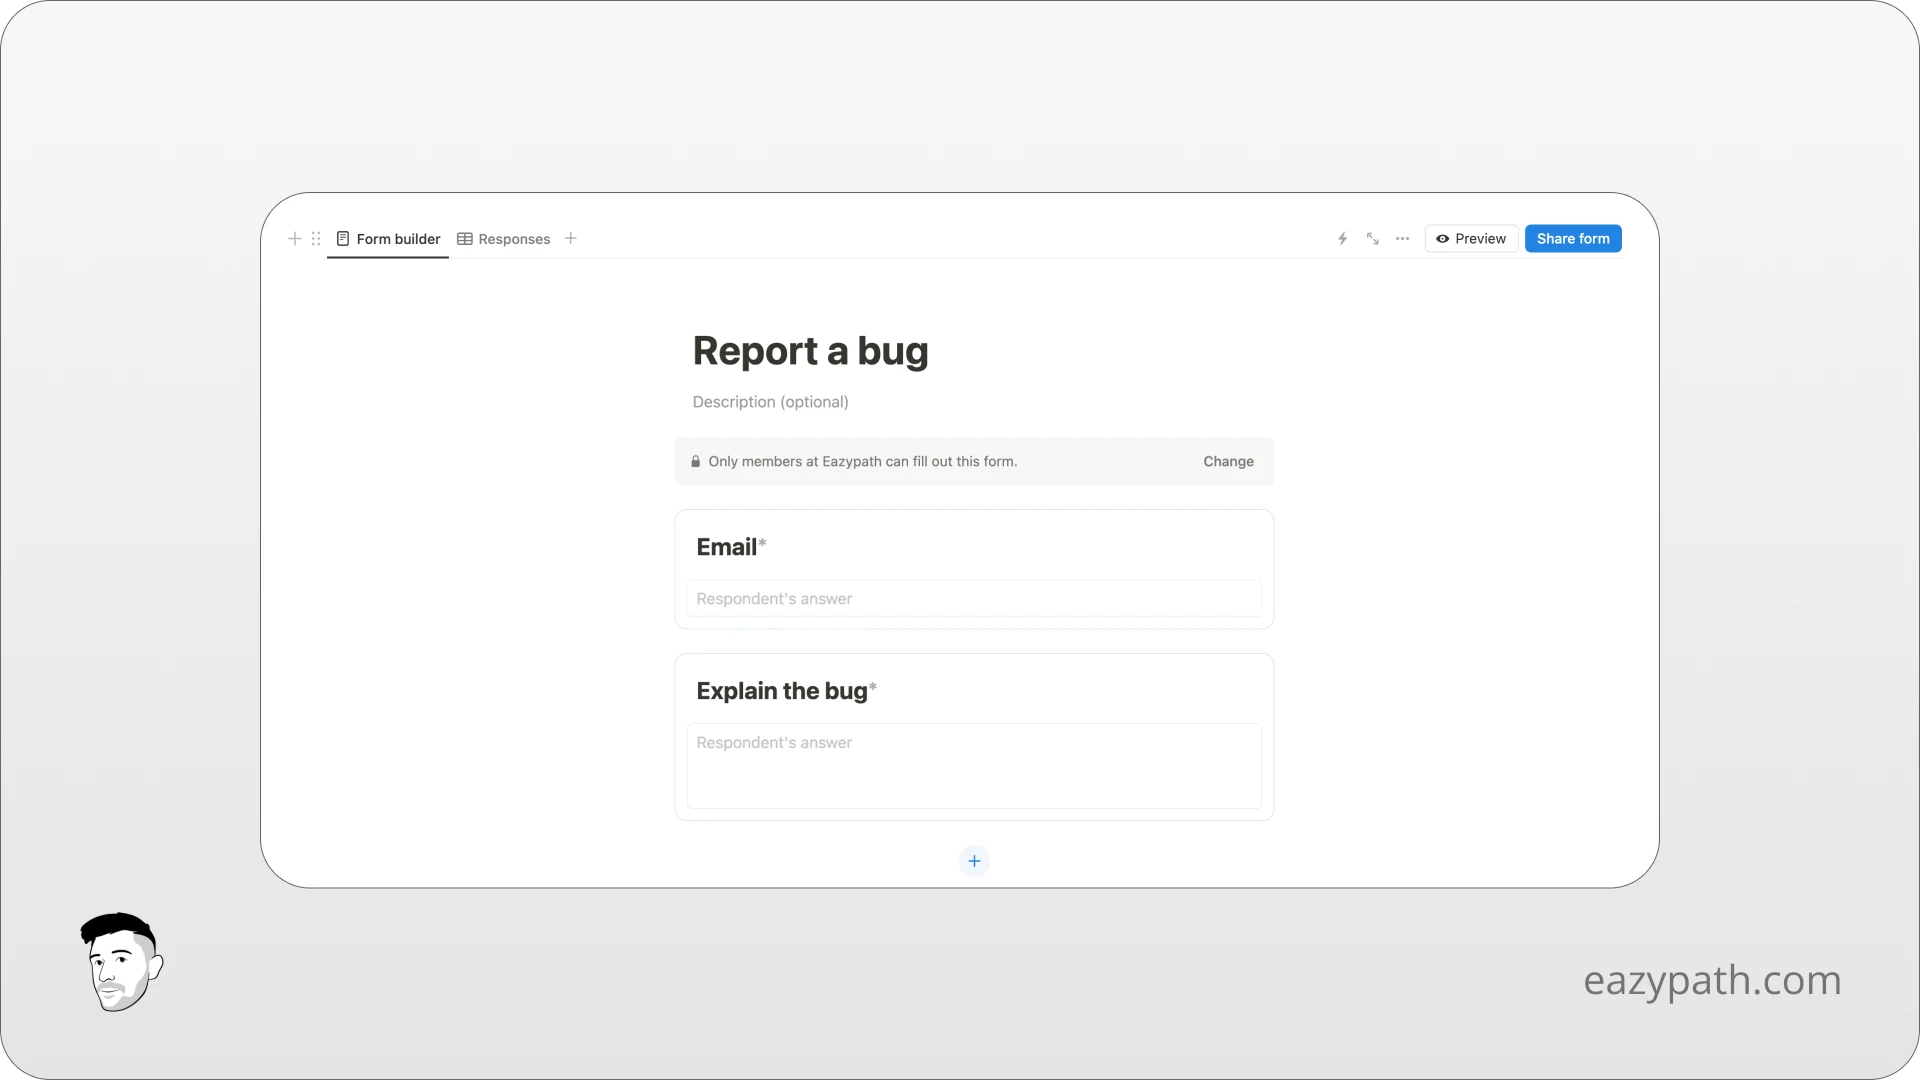
First of all, create a simple form that will be used, for example, to report a bug. It is important to have an email field in this form to make the automation work.
To learn how to create a form in Notion, read this article for a step-by-step guide on creating Notion forms (learn to create Notion forms).
Your form should look like this:
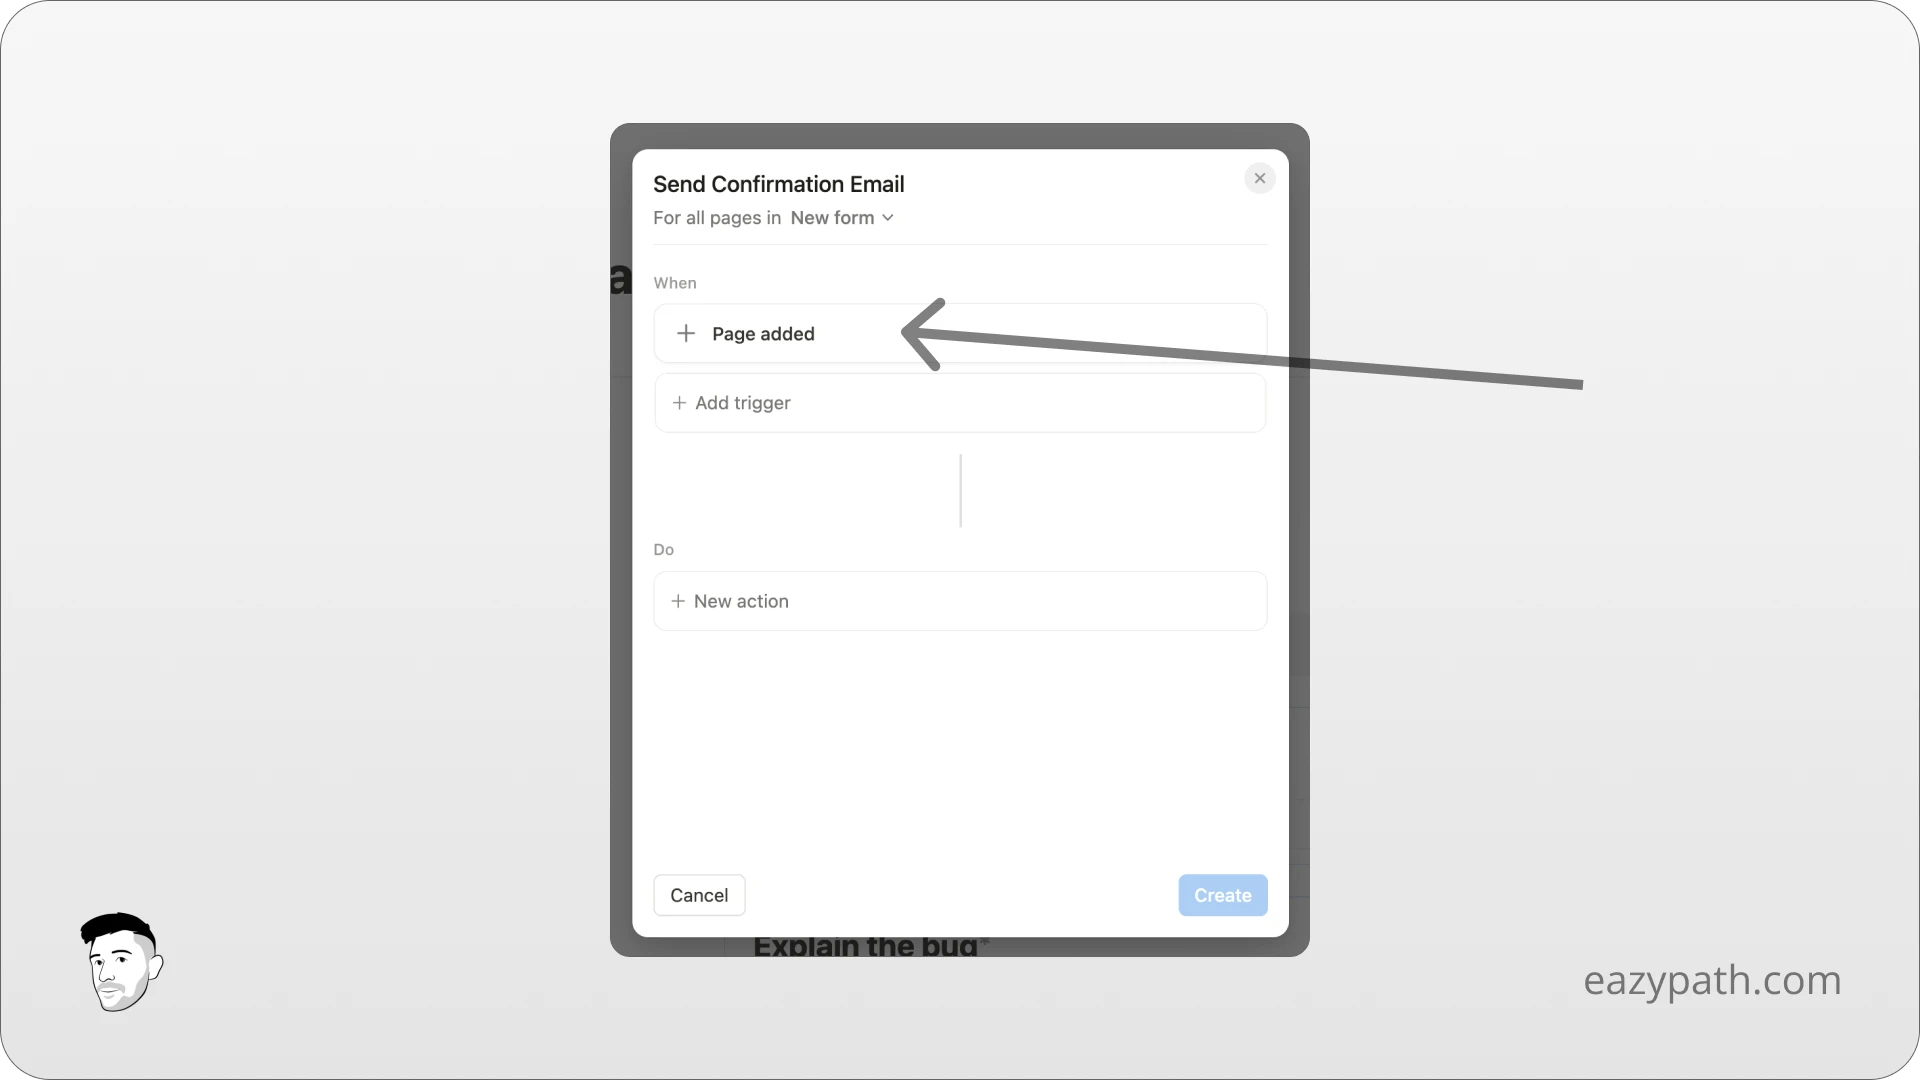
Let's just start our automation. Name it "Send Confirmation Email," set the scope to "all pages," and add "Page added" as a trigger to let the automation be triggered when a form is submitted.
For the action, you will choose the option "Send email to." There, you will probably need to connect your Gmail account to it; nothing really complicated.
Once done, you can customize your email. First, choose in the "To" field the property email to send the email to the person who just filled out the form. The rest, you can customize as you wish!
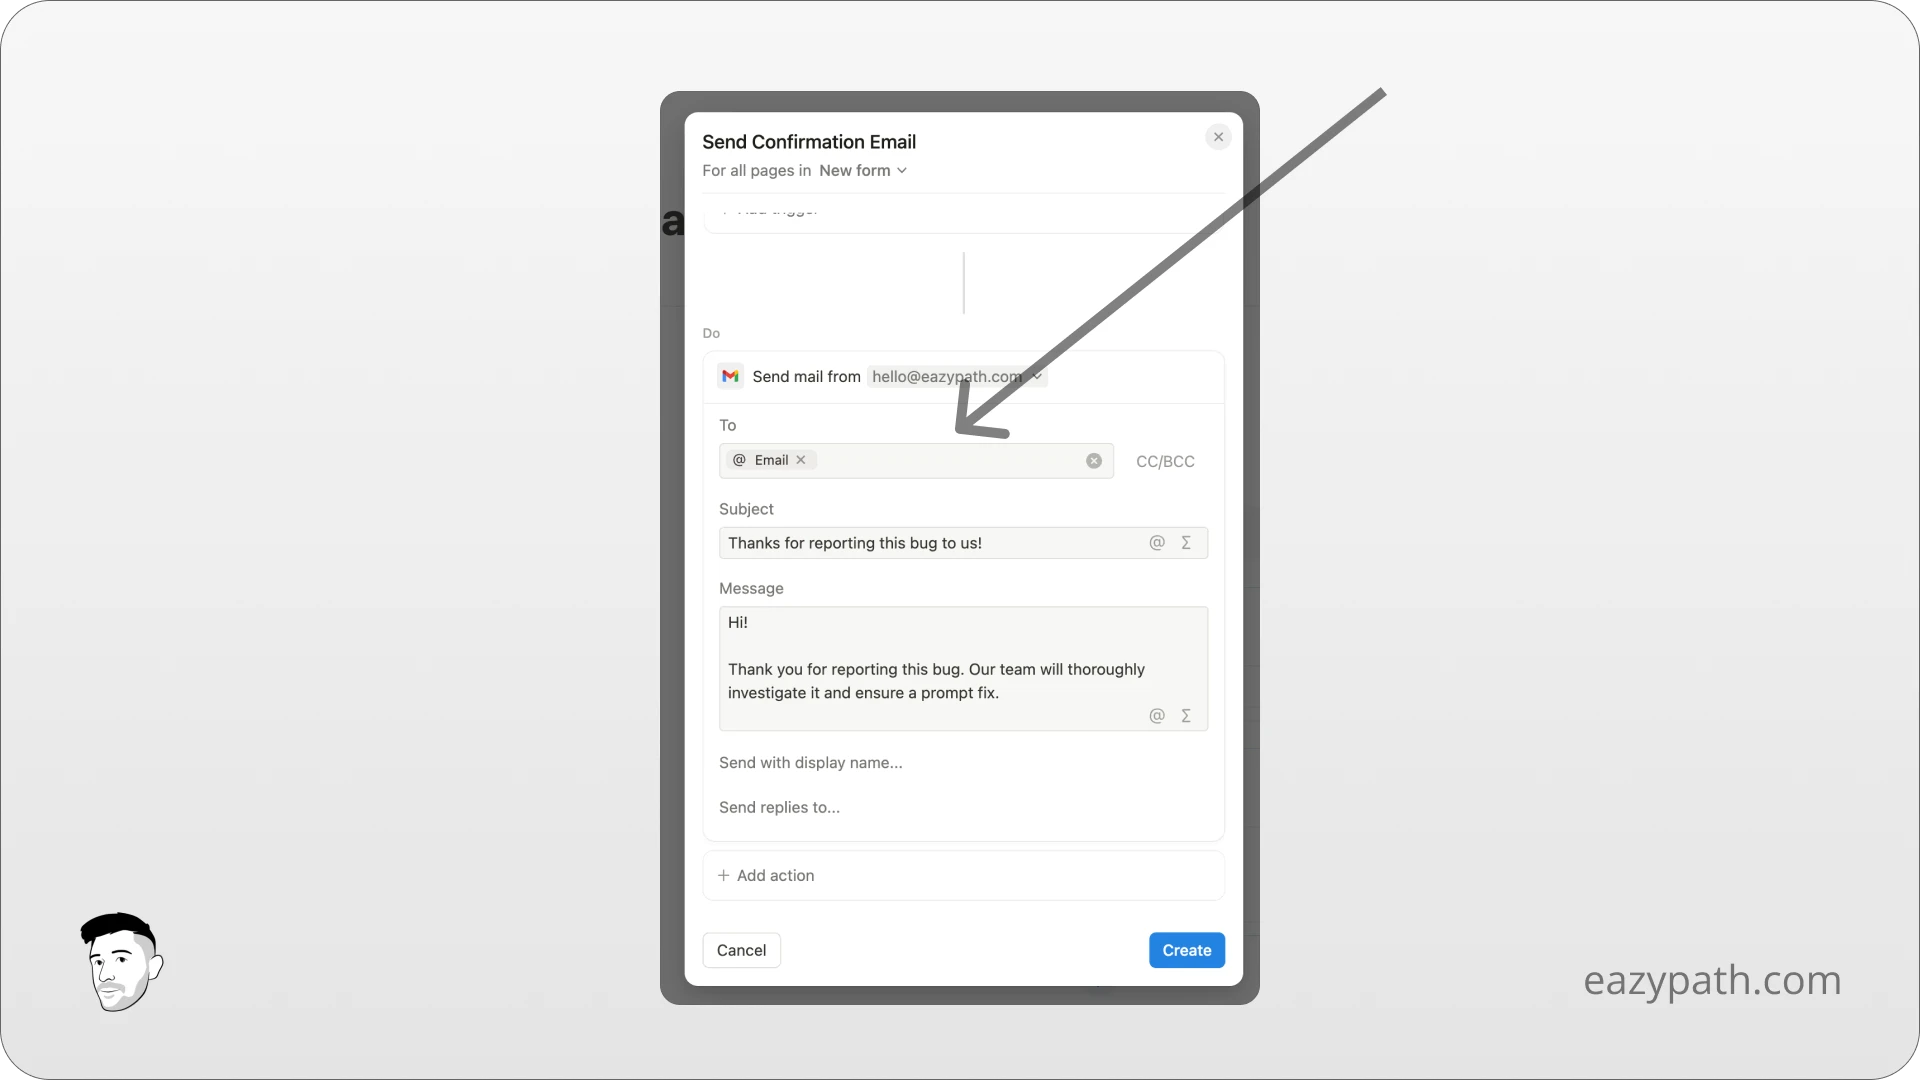
That's all! Now, when someone fills out your form, an email will be sent to confirm receipt of the inquiry.
You can try it yourself by sharing the form, copying the URL, and filling it out.
Create Recurring Tasks
The last automation we will see is creating a similar task a week after every time this one is completed.
For this, we will need one tasks database with:
Date as a date property
Completed as a checkbox property
Repeat as a number property
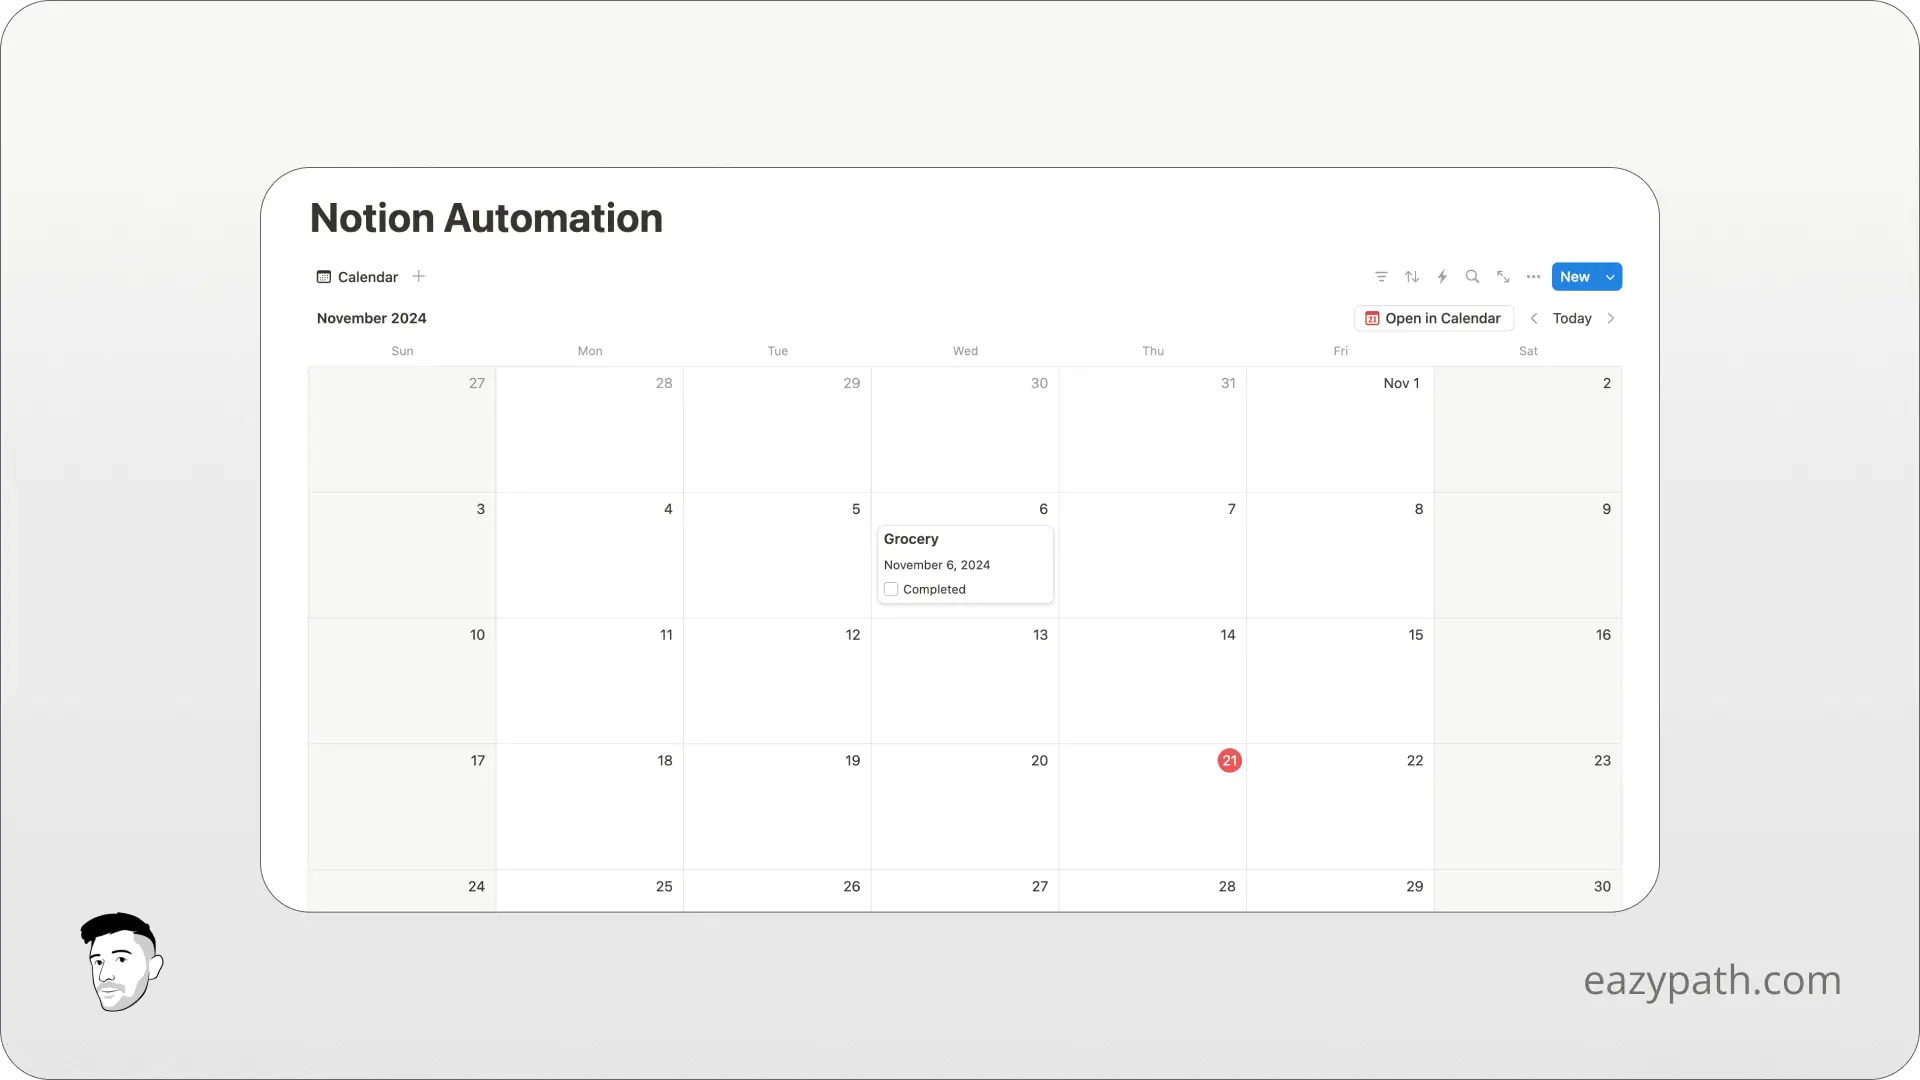
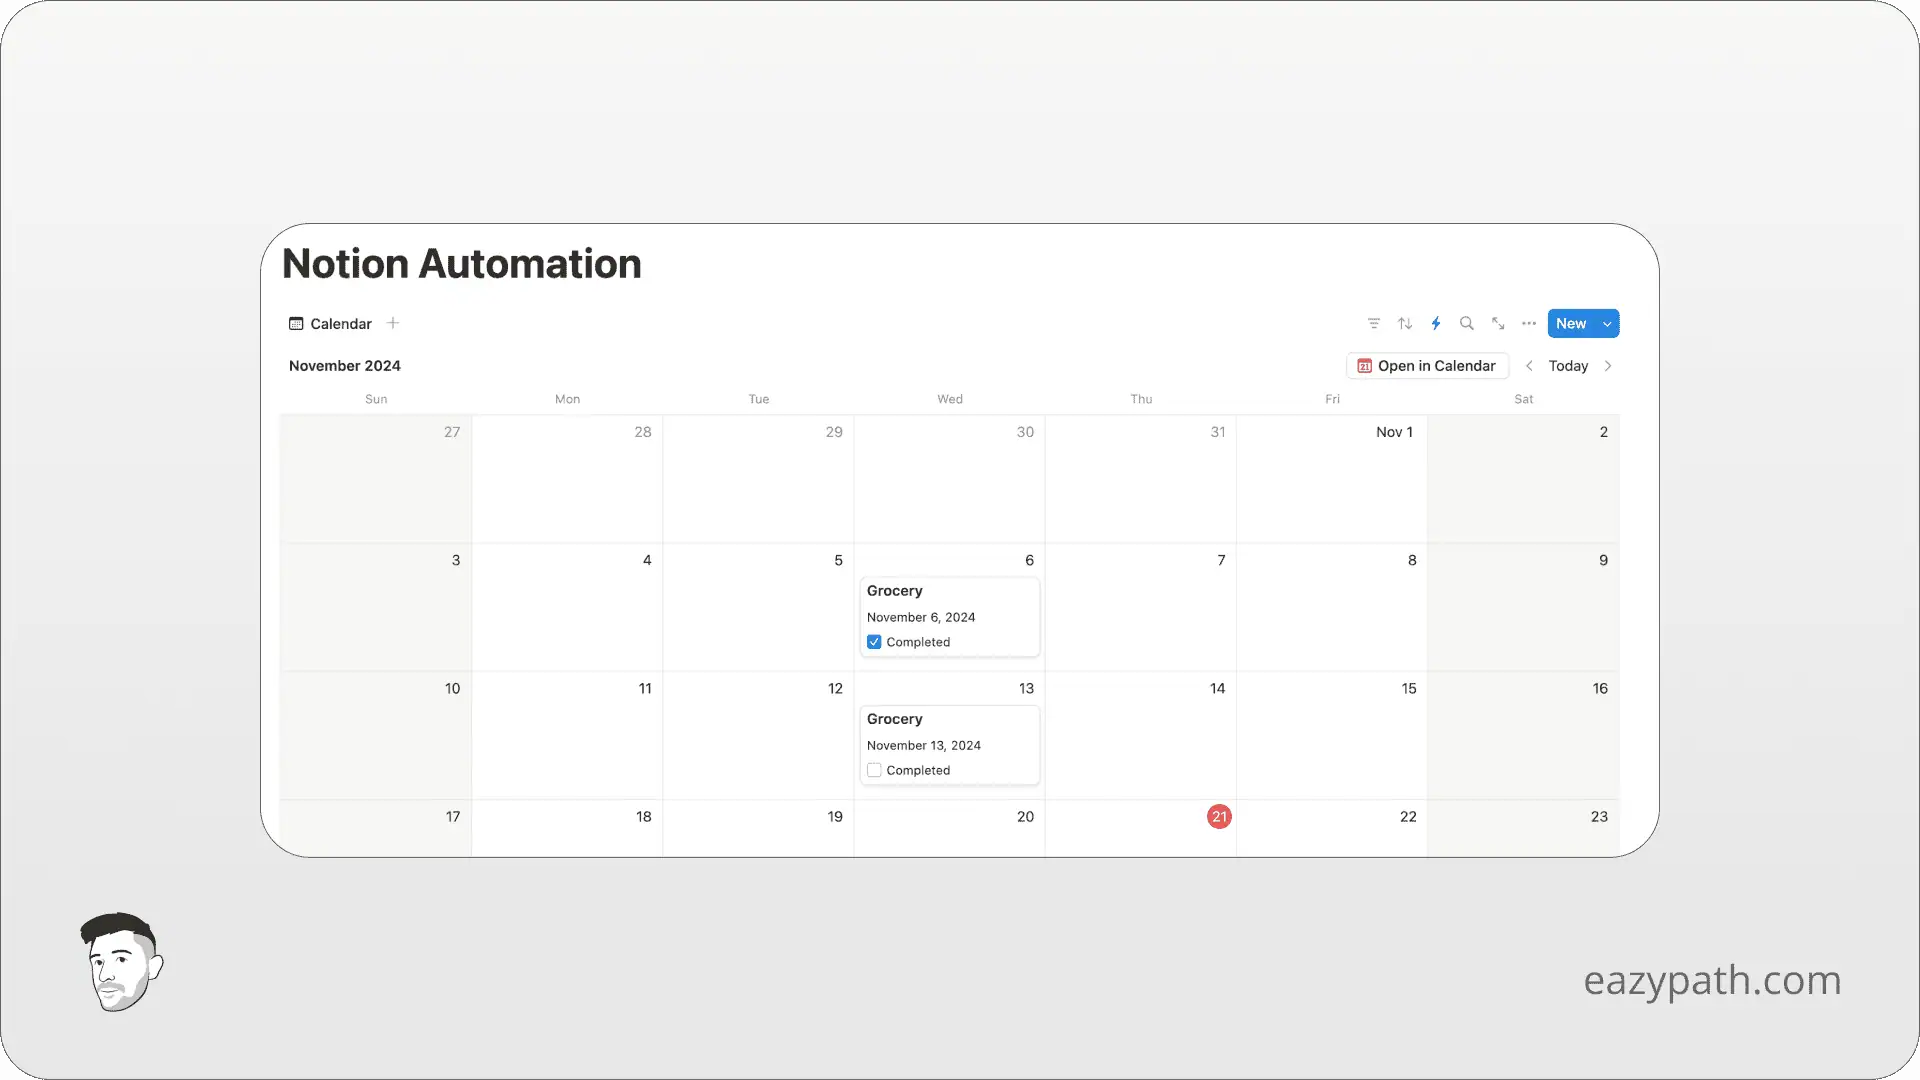
Let's create a task, for example, "Grocery," that we will repeat every week, every Wednesday. For this, we will set the date to the next Saturday and the repeat to 7 (for 7 days).
We will also set the view to a calendar view to see the automation working live.
You should have something like this:
As usual, click on the lightning symbol to start creating the automation. Name it "Set Recurring Task" and set the scope to all pages in Tasks.
For the trigger, this time we will choose the option "Property", choose the "Completed" property, and set it to "checked". This way, the automation will trigger when we complete the task.
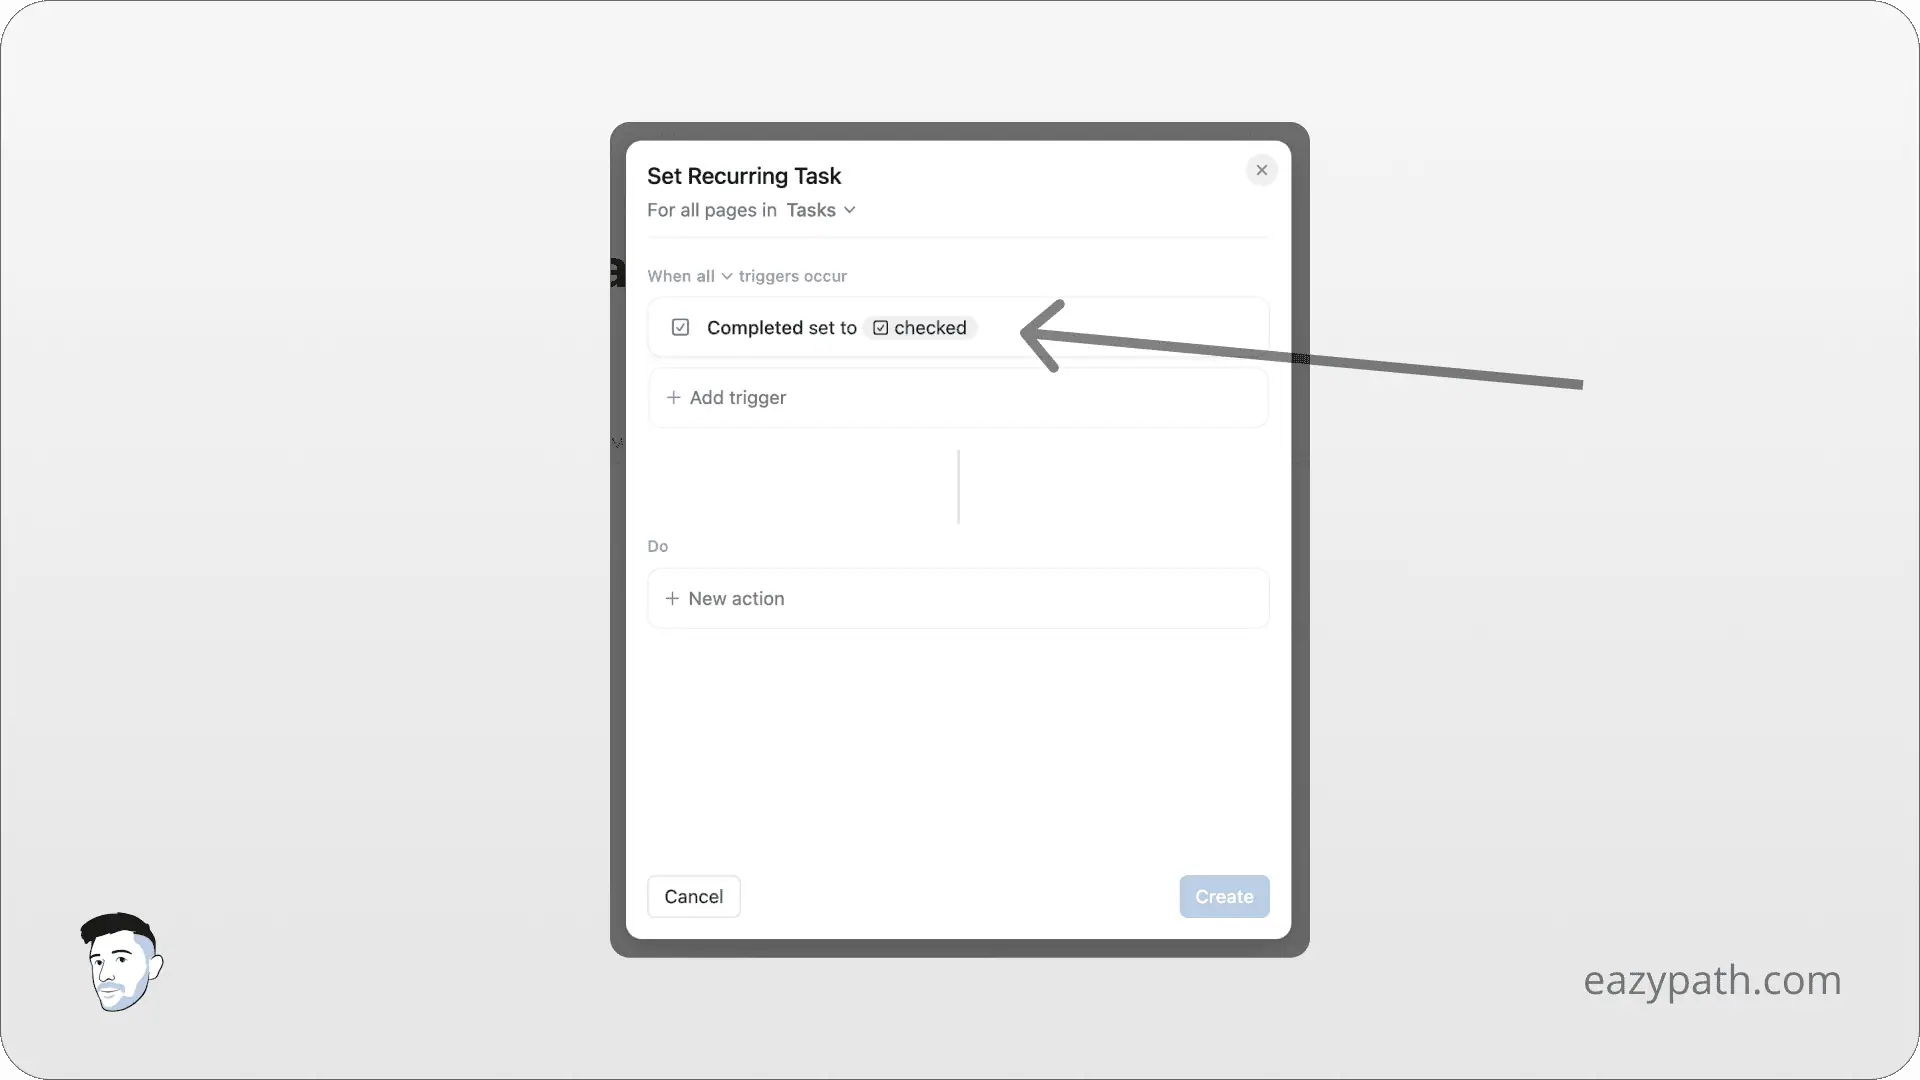
Now let's set the action. We want to create the same task 7 days (the value of the repeat property) after we complete the task.
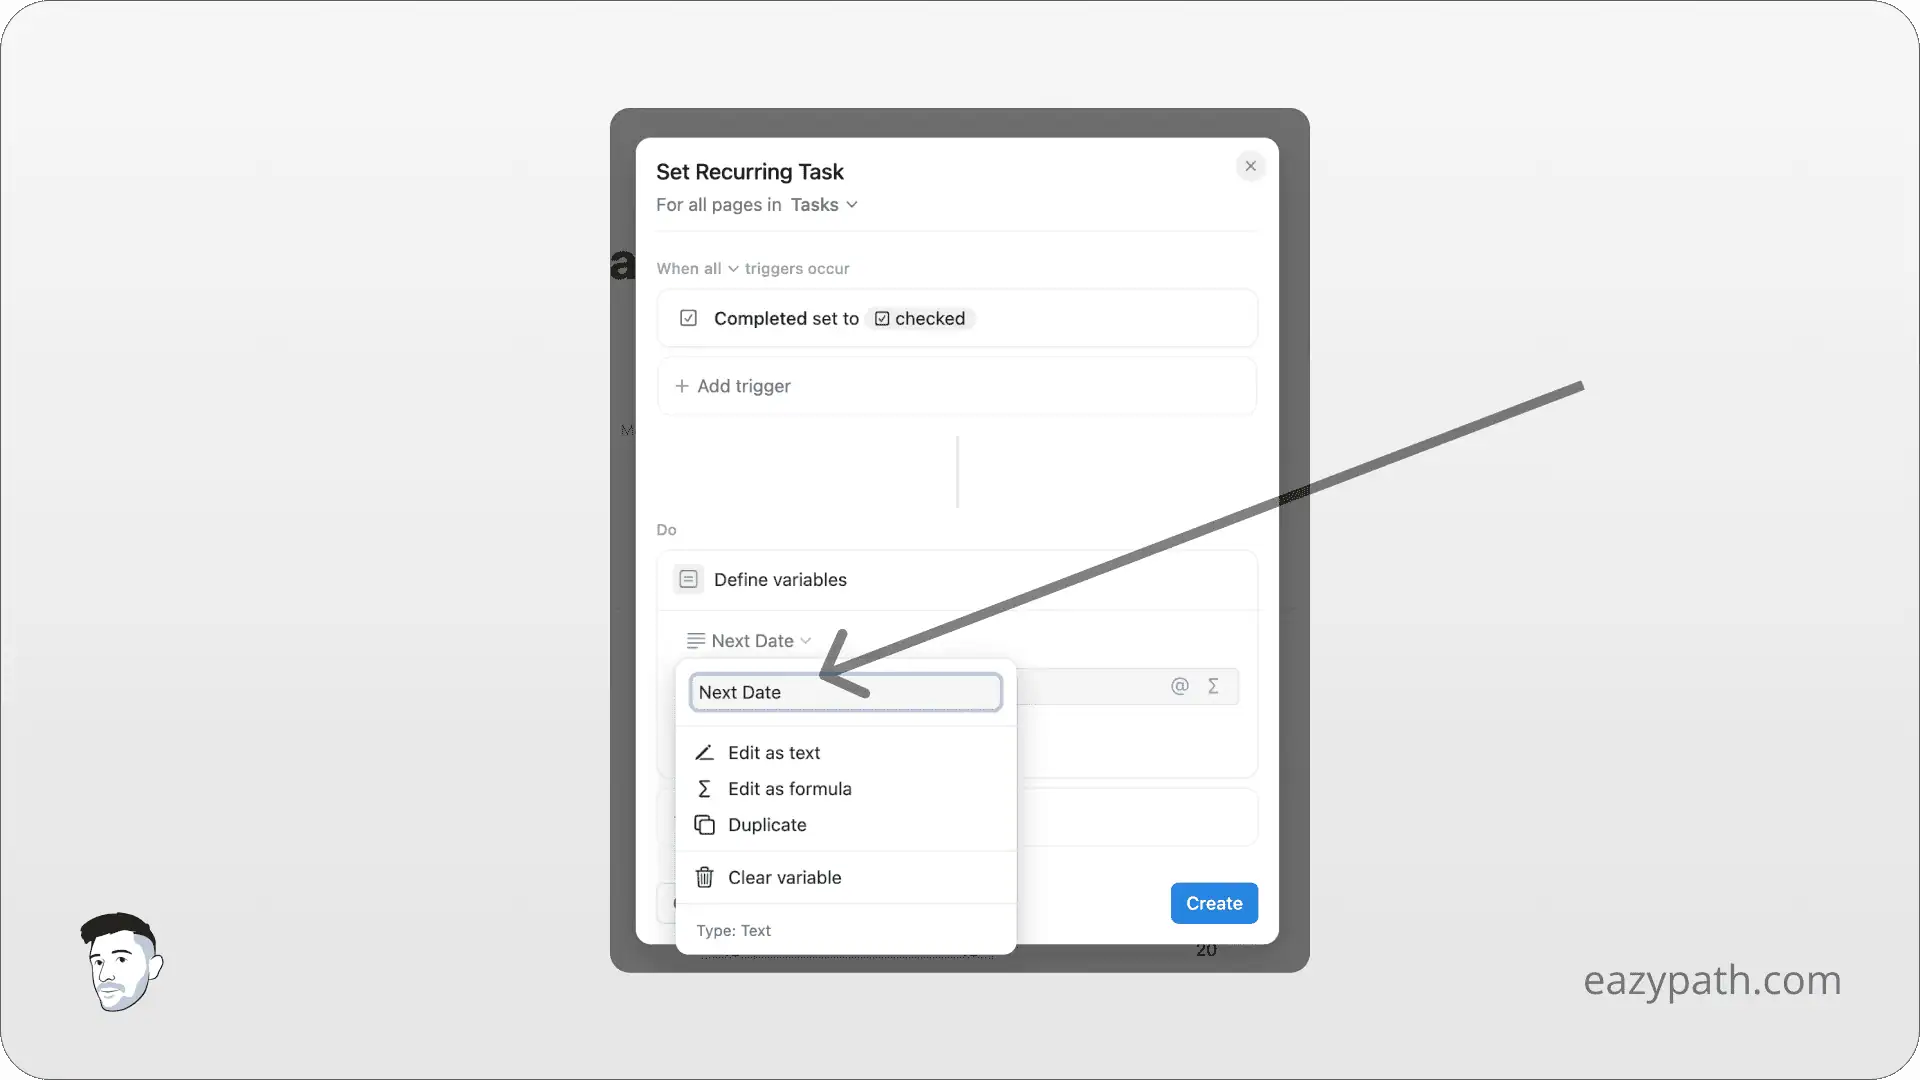
But first of all, I want to show you the use of variables in automations. We'll start by selecting "Define Variables" and create a variable to represent the date seven days from now. Once you have chosen the option, click on the name to rename your variable "Next Date," like so:
Now, click on the formula symbol and set the formula like so:
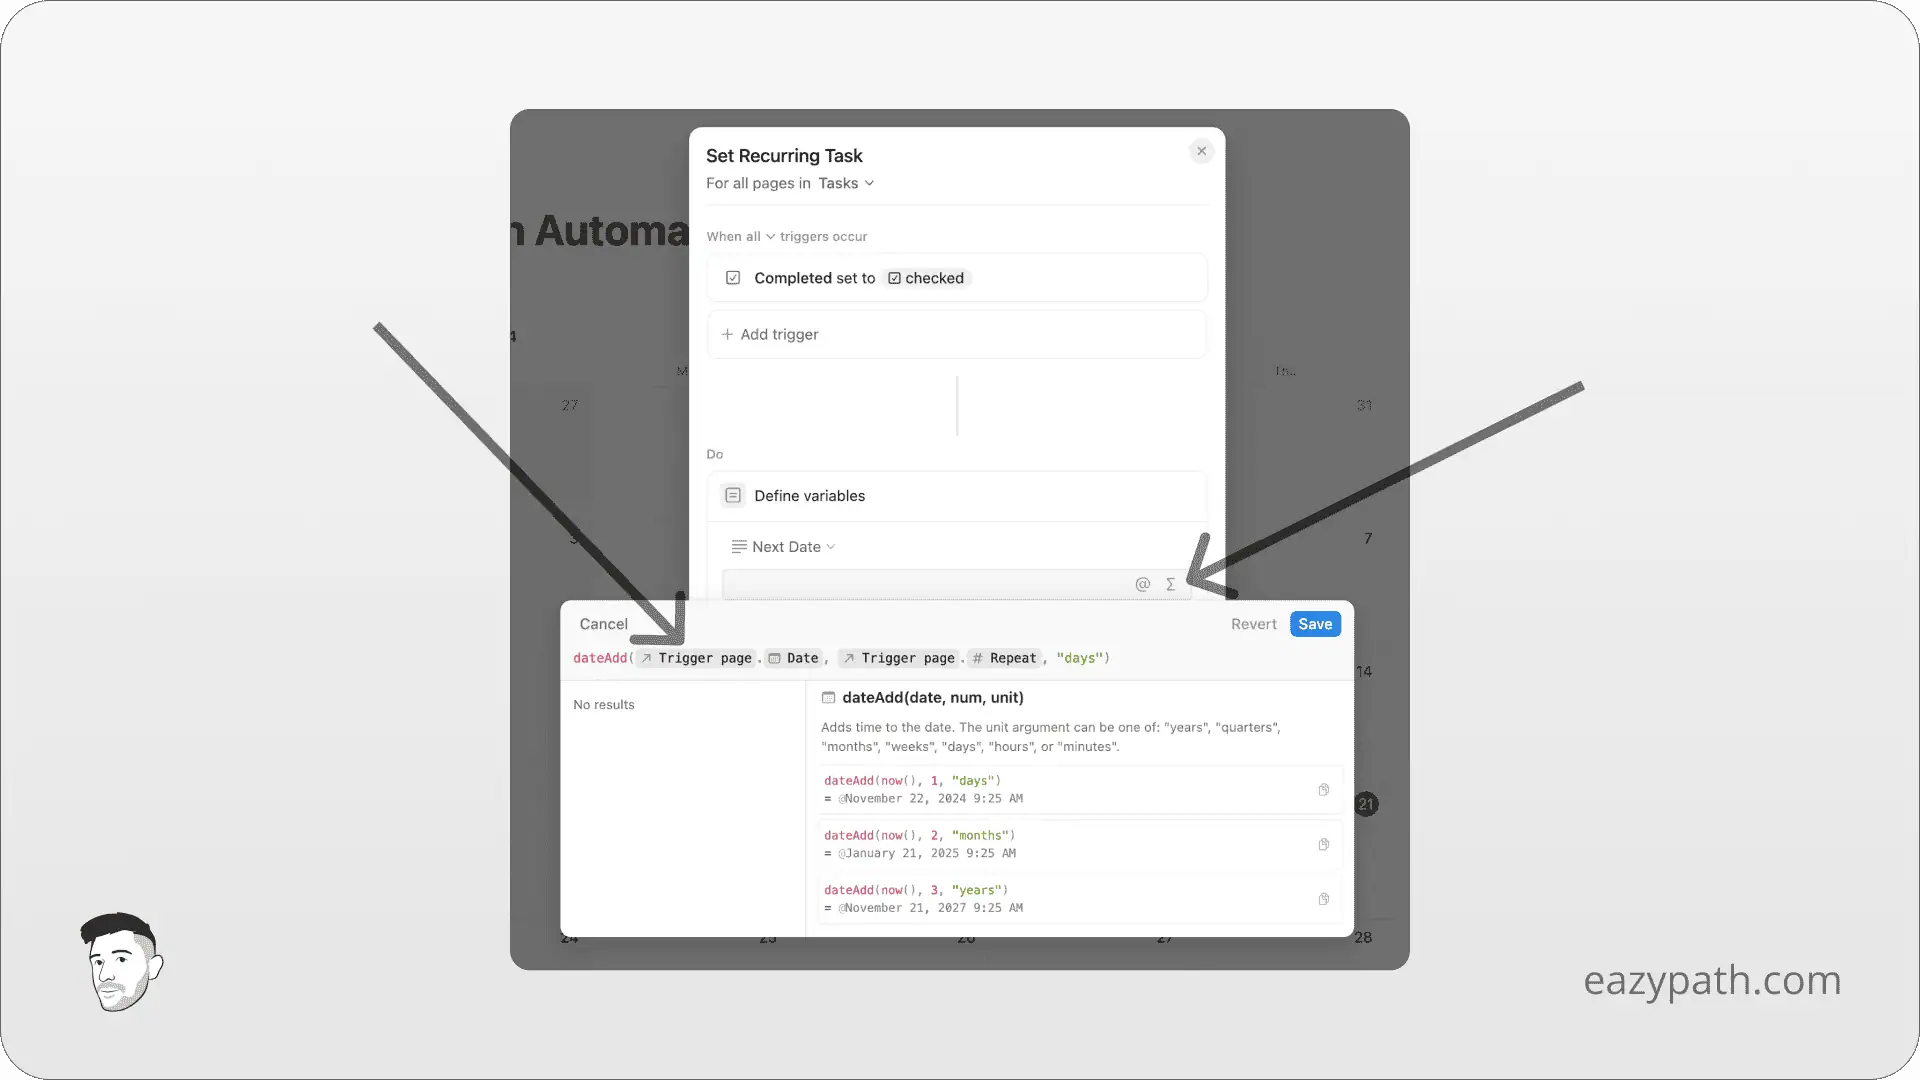
This formula means that we will add the number of days of the repeat property of the page triggered to the date of the page triggered. This way we will have a date 7 days later.
Next, we need to create the new task. We will choose the option "Add page to" and select the "Tasks" database.
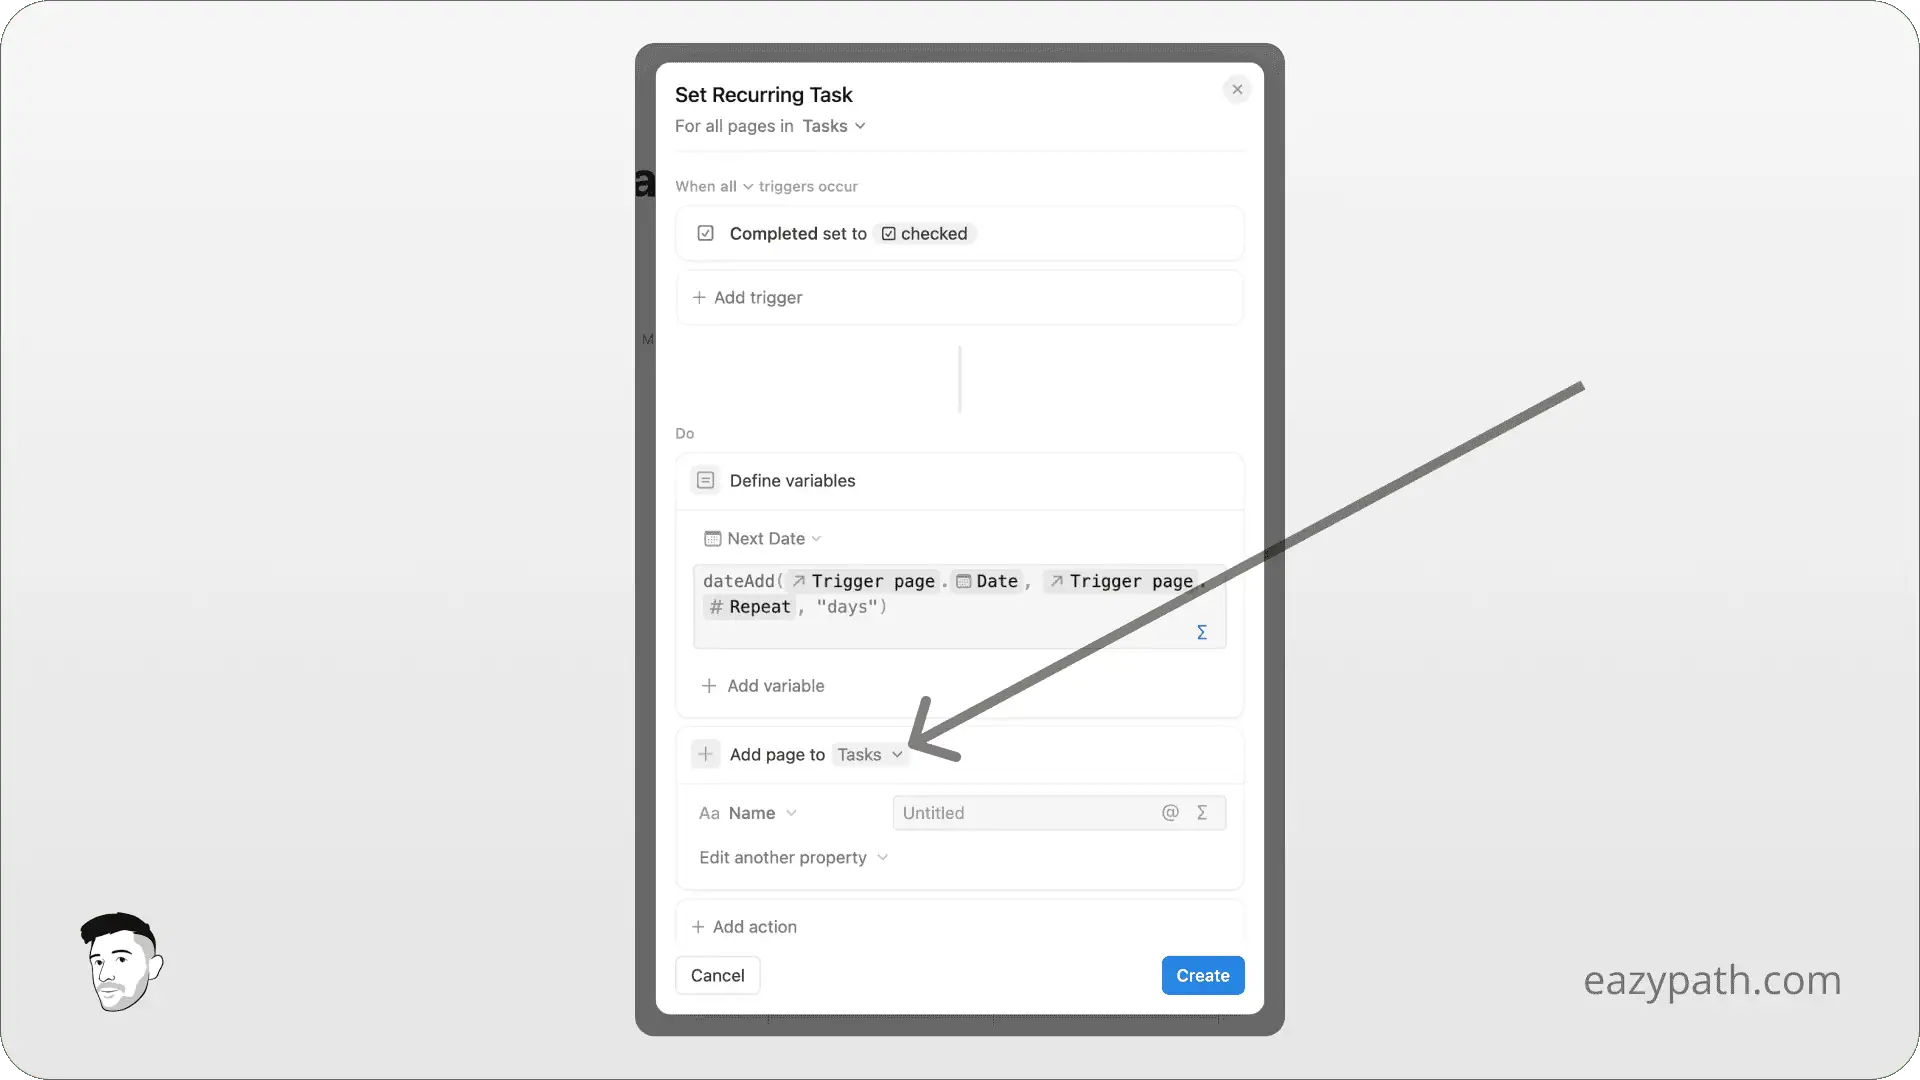
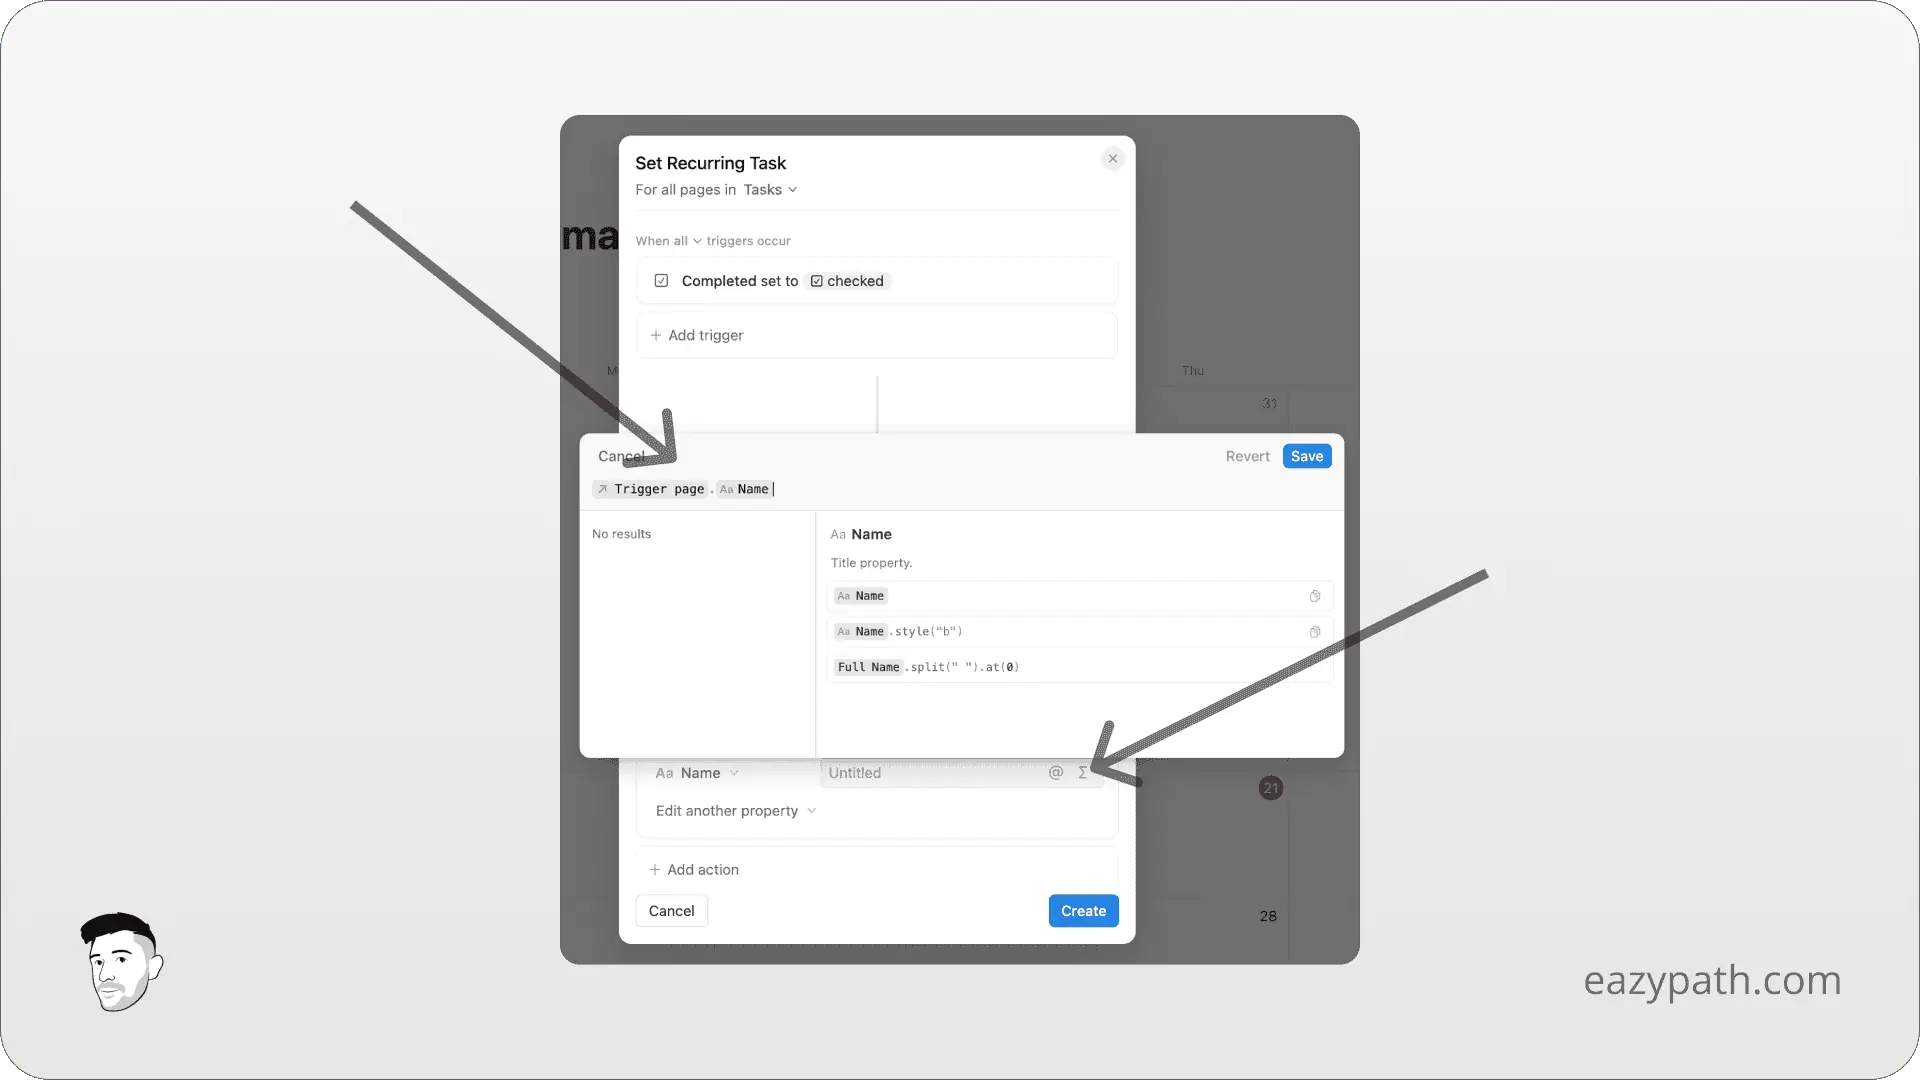
First let's set the name of the new task identical of the completed task. We will use a formula for this. Click on the formula symbol and set the formula like so:
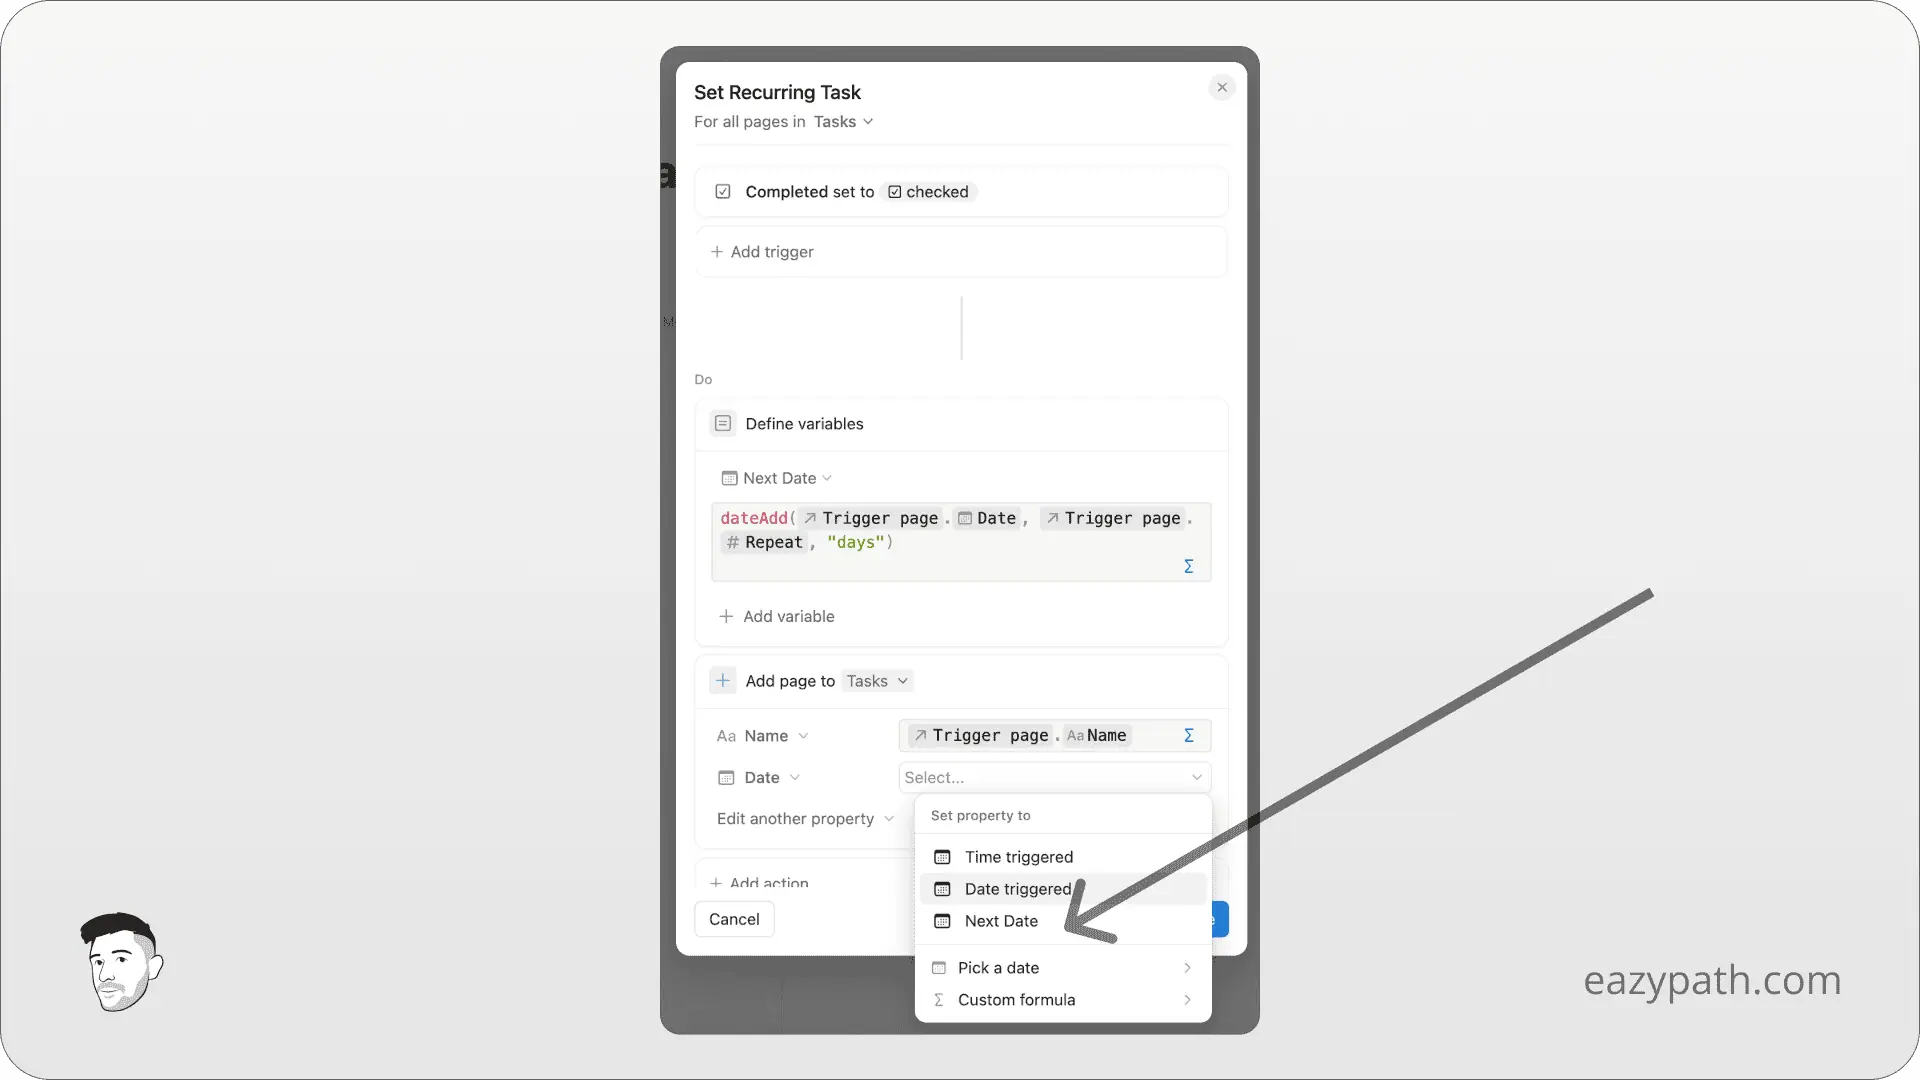
Now we will edit the Date property by setting the value of the variable we just defined. You will find your variables among the options.
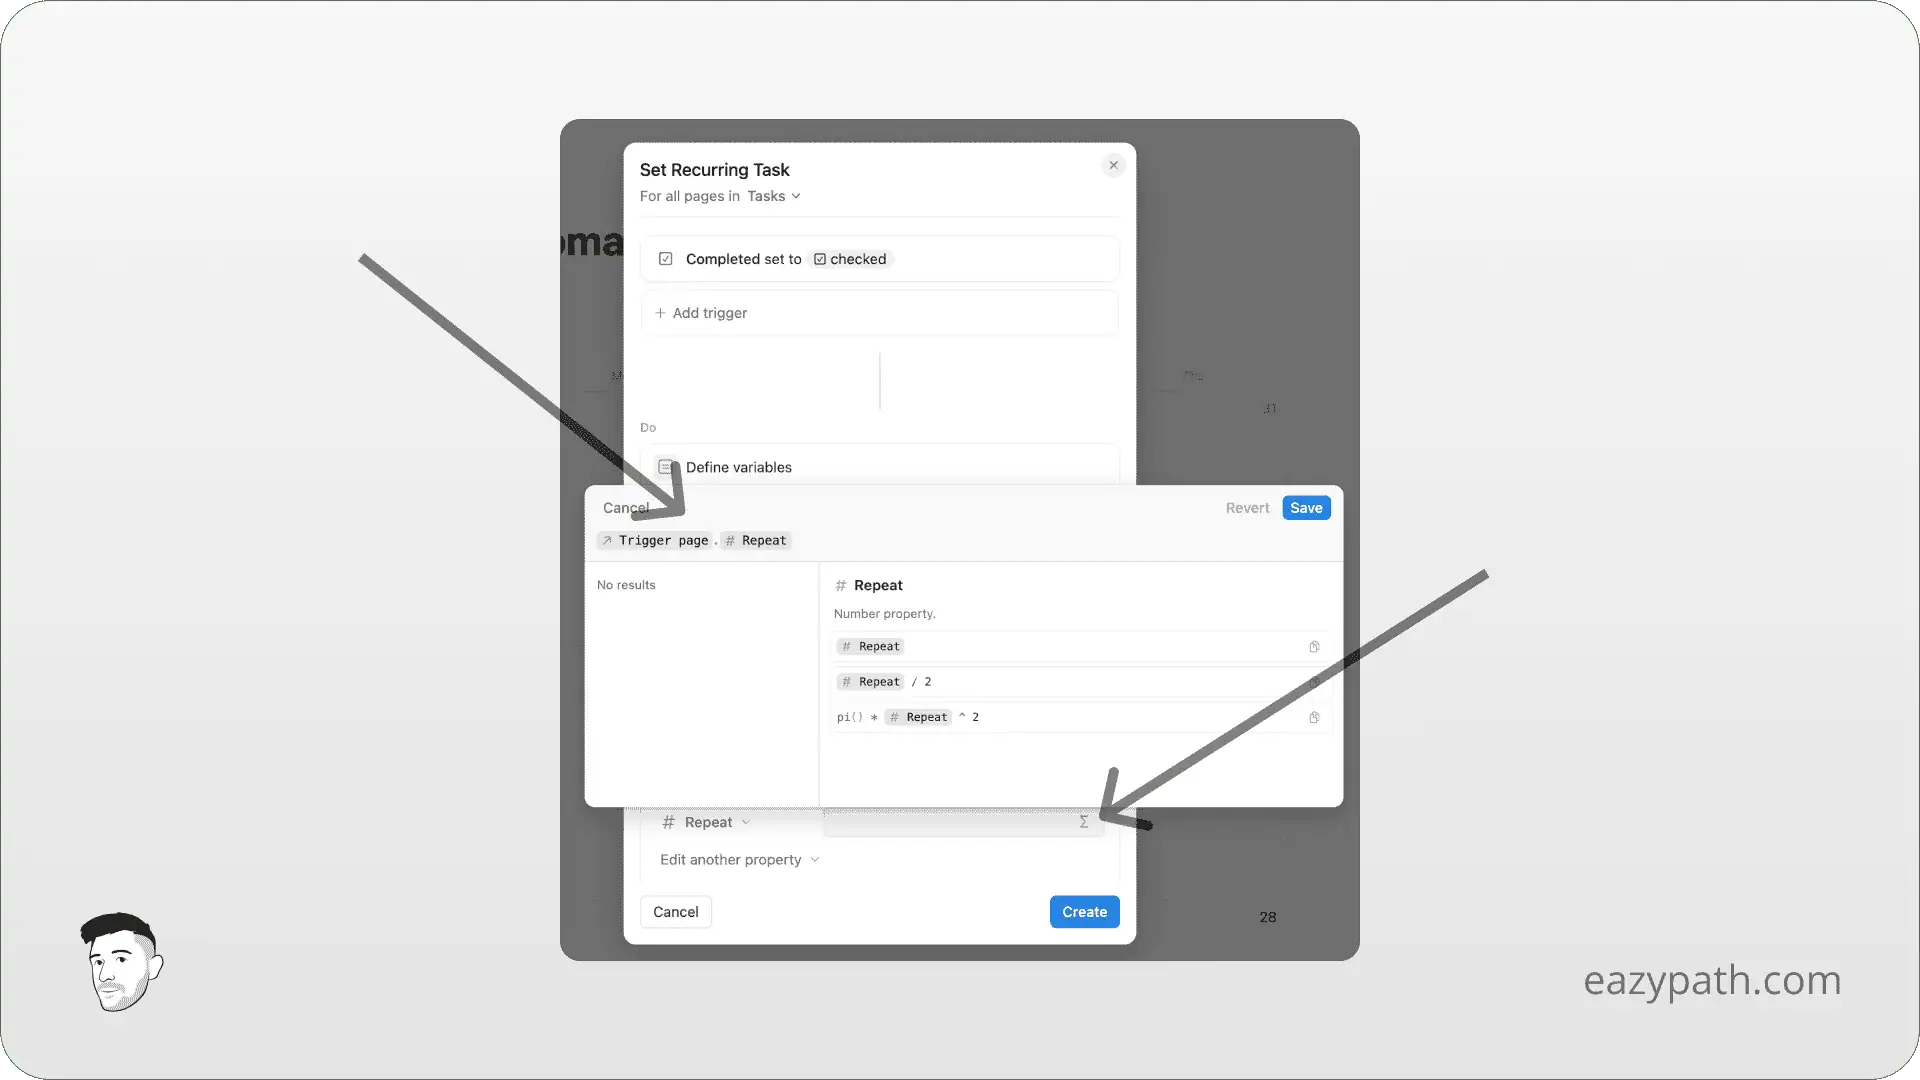
Finally, we will also set the repeat property of the new task identical to the repeat property of the completed task in order for our automation to continue working. Click on the formula symbol and set the formula like so:
We are done! To be sure, your final automation should look like this:
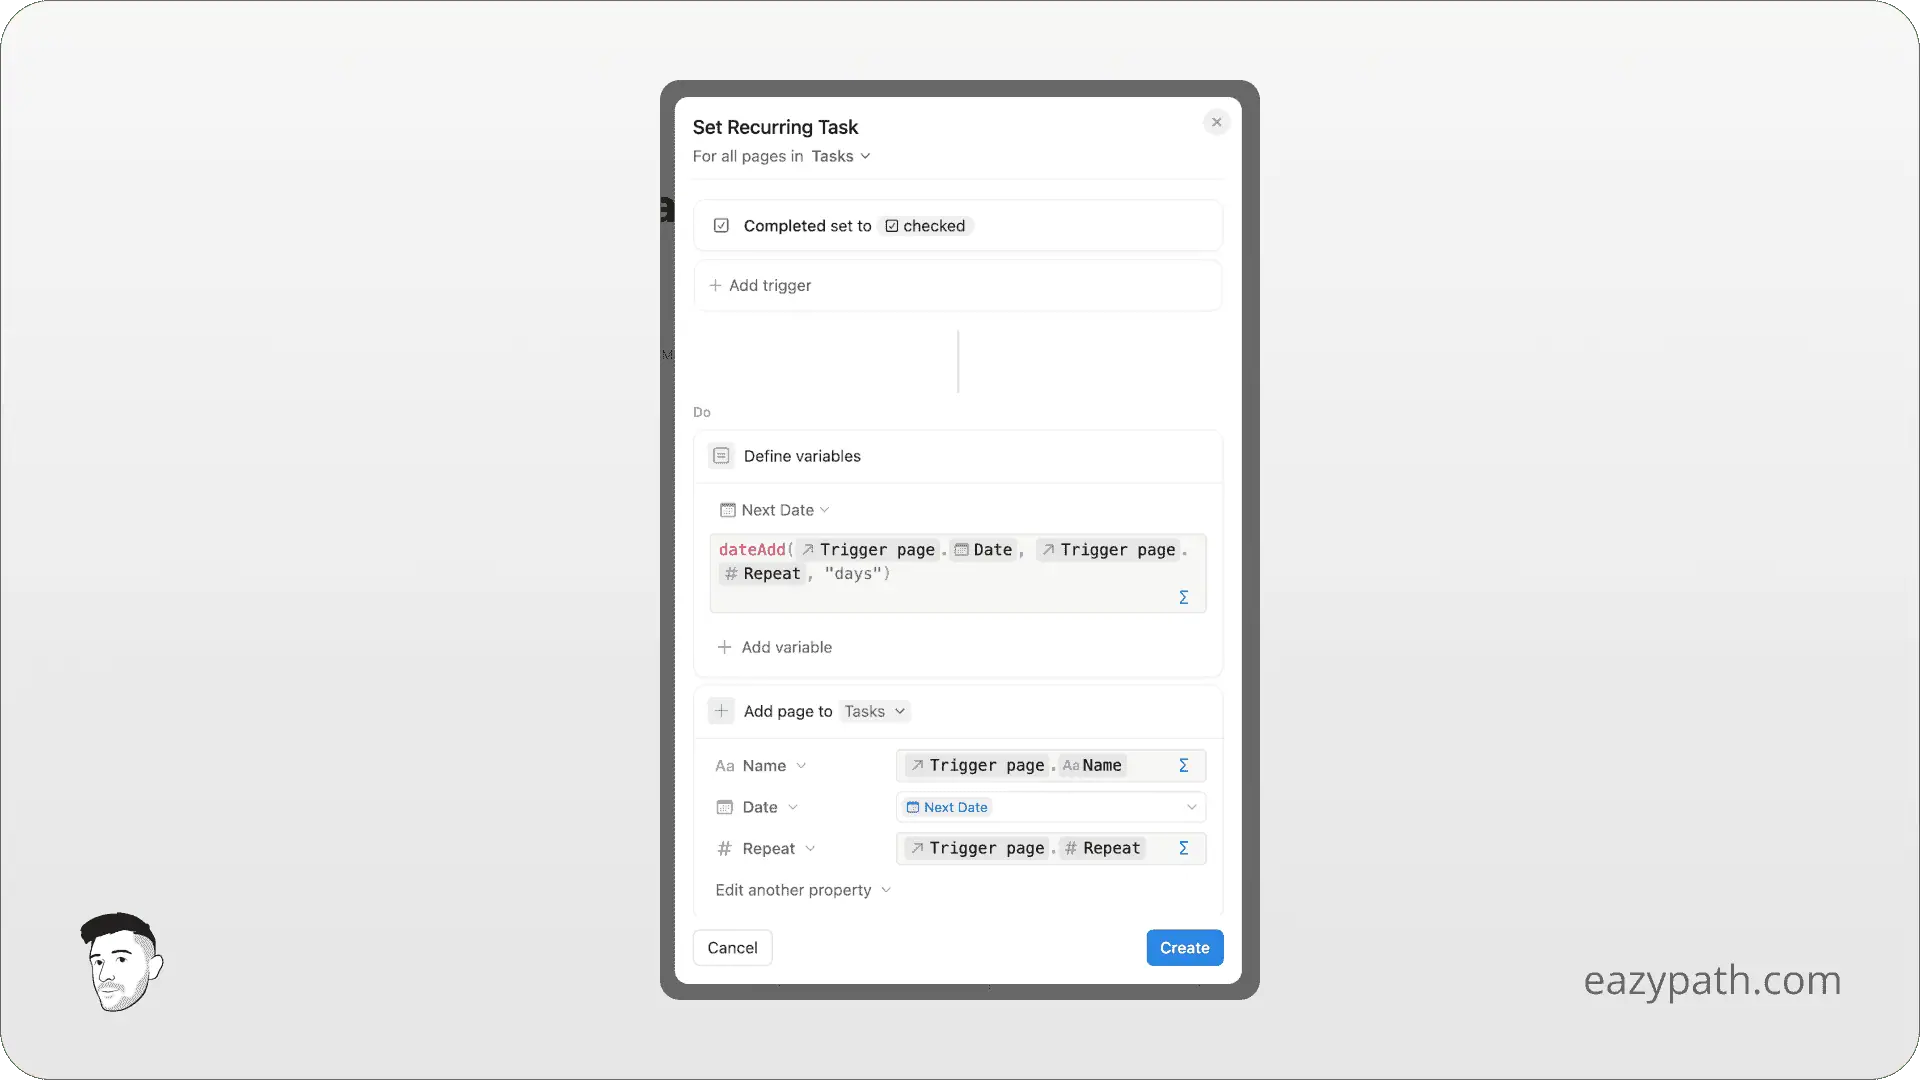
Note that we could not use the defined variables option and directly set the formula in the date property. It was just to show you how to use variables as it can be really helpful if you want to reuse a formula several times.
Now, if you complete your original task, you should see a new task appear 7 days after this one (it can take a few seconds for the automation to work), and it will repeat every time you complete the task!
Who Can Use Notion Database Automations?
You should know that Notion database automations are not available for everyone. Users with the Notion free plan will be able to:
Create Slack notifications
Use automations that have already been created on a template
It means that if you are not on a Notion paid plan and you purchase a template with an automation like the ones we saw before, you will still be able to run the automation, but not make any edits to it.
However if you have any of Notion paid plan you will be able to:
Create and edit automations
Run automations
Delete automations
In complete honesty, I think it's one of the main features why it becomes worth it to have a Notion paid plan as you can use it for many use cases. And it keeps getting better and better. The ability to define variables and the use of formulas, for example, are really new, and I'm sure they will add more features in the future.
So it may be your time to think about get a Notion paid plan!
Conclusion
Throughout this article, we've explored the power of Notion database automations, offering just a glimpse of their full potential.
I include a lot of Notion database automations in my premium templates to make them easier to use and to streamline tasks for you.
I hope this article has enhanced your understanding and you feel ready to kickstart your own creations!

